


As most gardeners know, it’s easy to accidentally grow a giant zucchini. It is the usual outcome of leaving a zucchini plant untended while you take a weekend away.
Fermented zucchini relish is my answer to an over-abundant crop. The relish is salty, sweet, and tangy. Perfect for a summer BBQ or a cheese platter.
Even if you are new to fermenting, it’s easy to make zucchini relish. It doesn’t require any cooking, all you have to do is pack the ingredients in a jar and let fermentation do all the work!

Long-term storage of fermented zucchini relish
If you end up with a lot of zucchini, then it’s pretty handy to make a LARGE batch of zucchini relish. Here are a few ways to store your relish for the winter.
Cupboard
Zucchini relish can be left on the shelf of a dark cupboard or closet for a really long time. It will continue to ferment for around a month until the vegetables are very soft and fully fermented.
If you want to keep your relish in a cupboard for up to six months, here are a few changed you need to make to the recipe:
- Increase the salt to 1 Tbsp.
- Make sure you start with a sanitized jar. Just pour boiling water into the jar and leave it for 5 minutes to kill any wild yeasts and bacteria.
- Use a jar with a fermentation-specific lid, like a fido jar, however, you could use a mason jar with an airlock or a pickle-pipe lid.
- Don’t add any sugar or vinegar until you are ready to start eating the relish.
Fridge
Fermented condiments will last for several months in the fridge. I say 2 months in the recipe, but to be honest, I’ve never had a fermented condiment go off, so I really don’t know how long they’ll last!
Here are a few things to keep in mind:
- Use an air-tight lid to prevent unwanted fridge smells from getting into your relish. It may still be a bit bubbly, but the cold temperature should slow that down.
- No double-dipping! Always use a clean utensil to prevent contamination.
Freezer
The freezer is a great way to store fermented condiments. They’ll remain probiotic and delicious for several months! Either freeze in plastic containers, or straight-sided mason jars. (I recommend 1-cup portions). Then defrost for 24 hours before serving.
Canning Zucchini Relish
Canning will kill all the yeasts and bacterial in your relish. So it won’t be probiotic. However, the jars of relish will be shelf-stable for years. And they make excellent gifts. I usually can a batch of zucchini relish every few years, just as a backup for when my fermented jars are finished.
If you want to can zucchini relish for long term storage the follow these rules:
- After fermenting, drain the excess brine. Put the fermented vegetables in a pot then add 1/2 cup of sugar and 1/2 cup vinegar.
- Bring everything to a boil, then simmer for 30 minutes to reduce the liquid.
- Pack into 250ml mason jars. Process in a boiling water canner for 15 minutes. If you don’t know how to do this, then Bernardin has a good tutorial on how to process high acid foods.

Fermented Zucchini Relish

Need a way to use up some giant garden zucchinis? Zucchini relish is a savoury and sweet condiment that is perfect with cheese or for a barbecue. This relish is fermented rather than cooked to soften the vegetables. Not only is fermenting EASIER than cooking, it also is probiotic!
- Prep Time: 15 minutes
- Total Time: 15 minutes
- Yield: 1 quart jar 1x
- Category: Condiment
- Method: Fermented
- Cuisine: American
- Diet: Vegan
Ingredients
Ferment
- 3 cups grated zucchini
- 1/2 medium onion, finely diced
- 1/2 of sweet red pepper, finely diced
- 2 1/2 tsp salt (non-iodized)
- 1 tsp ground turmeric
- 1/2 tsp ground nutmeg
- 1 Tbsp grated horseradish (optional)
After fermentation
- 1 to 4 Tbsp sugar (optional)
- 1 to 2 Tbsp cup cider vinegar (optional)
Instructions
- Combine all the vegetables in a bowl, then mix in the salt and spices.
- Pack the vegetables into a quart-sized (1 L) jar for fermenting. Use a spoon to really pack it in. The zucchini should sweat off enough liquid to cover the vegetables. It won’t fill the jar, but it’s easier to pack into a larger-sized jar.
- Use a weight to keep the vegetables below the brine. Cap with a lid that will keep the fruit flies out while allowing the ferment to bubble (see notes for options).
- Ferment in a cool dark location for 3 days. A kitchen cupboard is perfect.
- After fermenting, drain off the excess liquid (about 1/2 cup). Otherwise, it will be a bit too liquidy and salty.
- At this point, you can add sugar and cider vinegar, to taste.
- Store in the refrigerator and eat within 2 months, or see the section above for information on options for long-term storage.
Notes
- I usually do most of my fermenting in fido jars
, however, you could use a mason jar
with an airlock or a pickle-pipe
lid. You could also go low-tech, and just cover the jar with a loose-lid or tea towel.
- Homegrown, organic zucchini should have the bacteria it needs to culture this ferment. If you are concerned, then feel free to use a vegetable starter.
- Powdered turmeric often contains sulfites as a preservative. However, it doesn’t seem to be enough to curb the fermentation in this recipe. If you have access to fresh turmeric, then feel free to use 1 tsp of grated turmeric instead.
- Fresh horseradish is pretty hard to find. So feel free to replace it with homemade prepared horseradish (not store-bought which is VERY high in sulfites). Otherwise, skip it altogether.
I am confused I would have thought you could easily half the amount of sugar and if you use live apple cider vinegar you would still not have to destroy all the bacteria?
Live vinegar stays stable when you have a lid on so it will not be pickling further just by closing the lid. What am I missing?
Hi Claudia, The sugar and vinegar in this recipe are both optional. They give the relish a typical relish flavour (tangy and sweet). It’s really up to you whether you want to add it or not. You could even just adjust the flavour right before serving if you prefer. This is one of our favourite recipes. Enjoy!
If I read the recipe wrong and added the sugar right at the start of fermentation will that cause issues with the fermentation? I re-read things and realized that I may need to throw my whole batch out now :’( Thank you for any info you can provide! I’m new to lactofermentation, so this is all new territory to me.
Hum… it should be fine. I wouldn’t throw it out. The biggest risk to added sugar is that it feeds yeast. So you may get wild yeast or kahm yeast growing in your relish. If you can keep a lid on it (but allow gas to escape) that should help. Also, maybe stop the fermentation after 2 days.
Cheers! Emillie
This came out spectacular! I used zucchini from the garden and instead of onion I used celery also from the garden. I added some caraway seeds and black pepper to the ferment and it worked so well. Thanks for another great recipe!
Great! Glad you enjoyed it!
I fermented mine for 20 days. I had planned on 2 weeks, but I forgot about it. I don’t get all these short ferments I see in recipes. It tastes great (I used my own recipe, I used shredded zucchini and peppers, nutmeg, powdered mustard, ginger, celery salt). I transferred it to half pints and vacuum sealed the lids on, put in the fridge. I got 3 and a half from one quart. Thinking about freezing the 3 because I have no idea what to use them for.
I often leave mine to ferment… sometimes for several months! (There’s a section on that above the recipe). However, some people prefer shorter ferments. It really depends on the flavor and texture you’re looking for.
We go through a lot of zucchini relish. I like it with cheese, sandwiches, and burgers. We also mix it with mayo right before serving for a tarter sauce-like condiment. It’s also nice stirred into potato salad, egg salad, etc. Enjoy!
I guess this is a great use for it because zucchini is absolutely tasteless by itself. I was eating one raw today and got tired of eating it, couldn’t finish it.
Is it ok to add garlic to this? If yes how much to get a garlic flavor?
Also, I sliced the zuchinni into roounds, and then cut each round into about 6 pieces. I just think the bigger pieces will be more to my taste. Is there any adjustments I need to do to recipe, with bigger pieces? Thank you!
Feel free to use whatever shape you want for your zucchini, no adjustments are required. The only important thing is to maintain the ratio of salt for the jar size. So if you need to use a bigger jar, adjust the salt accordingly. The zucchini will soften significantly, so expect your rounds to be very soft. Garlic is a delicious flavor option! Feel free to use as much as you want. I would probably go with 2 cloves for a 3-cup batch. Cheers!
Thanks so much for all your help! Much appreciated!!
I made the recipe and divided it into two jars with no adjustments to the salt. (I hope that is fine.) Also, can I open the jars to add the garlic after a day? What would happen? Thanks again!!! Can’t wait to taste it, it smells really good.
The salt in the recipe was the amount required for 1 quart. If you ended up making more than 4 cups (between the two jars) then you’ll need to add more salt (about 3/4 tsp per cup). It’s fine to pop open the jar and stir in the extra salt. You can add the garlic the same way. Just note that the garlic might be stronger than you expect if it doesn’t get a chance to ferment for more than 3 days. Cheers!
Wow! This is so helpful!! Much appreciated!!!
So special that you give from your time, and expertise to strangers!!!
Sorry, I noticed that my posts came up as anonymous before….
The thing about being a blogger is that I work alone. It’s nice to “chat” with people who are using my site. 🙂 Glad, I could help!
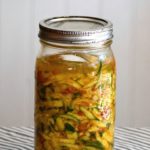
The recipe calls for shredded zuke, but the pictures show diced. I’m wondering if shredded turns out like mush?
The zucchini in the picture is shredded on a larger-sized grater. I have 3 options with my mandolin. 🙂 I have done it with the mid-sized grater as well. They both end up with a pretty similar texture. Zucchini is always pretty mushy. But since I use it as a condiment, it’s not a huge issue for me. Cheers!
Do you reckon that honey can be used instead of sugar?
Yes! Since the sugar is added after fermenting, it can be replaced by your favorite alternative sweetener. Cheers, Emillie
I understand from other blogs that vinegar will kill the probiotics. Does that include apple cider vinegar? I prefer that it taste more like typical relish but I don’t want to sacrifice the probiotics for better flavour.
Vinegar, even white vinegar, doesn’t kill the probiotics unless you’re using a lot (like trad pickling). Raw ACV is probiotic (and I often use it as a fermentation culture). So adding a bit of vinegar won’t kill off the probiotics. Enjoy!
That’s good to know. Thanks! I’m making some today.