
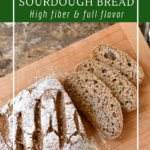
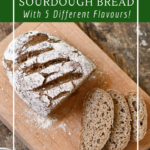
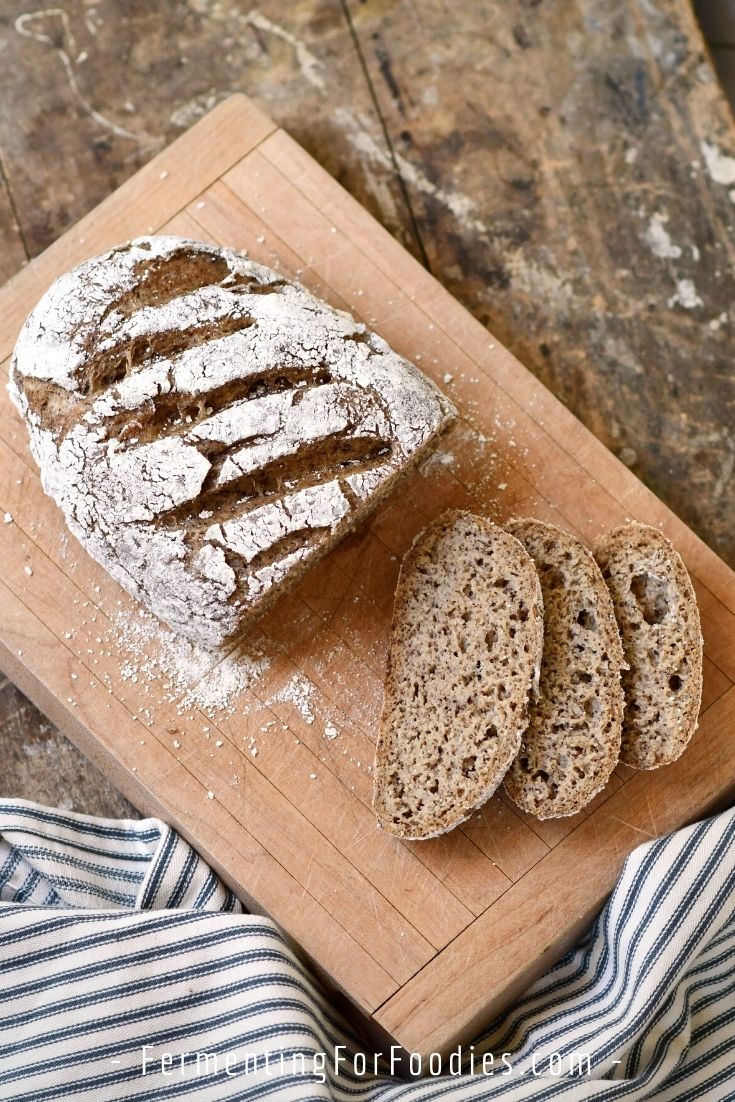
This gluten-free and vegan sourdough bread is deliciously moist, flavorful, and chewy. Perfect for serving with dinner or as toast the next morning. Even the wheat-eaters in my life have gobbled up copious amounts of this bread, describing it as “the best gluten-free bread they have ever eaten.”
A lower-carb, keto-inspired bread
To be honest, I worked on a good gluten-free and vegan sourdough bread for at least 4 years. I didn’t really hit on anything that worked until my mom introduced me to her favorite keto bread, which taught me about the binding power of psyllium husk.
As a result, this vegan sourdough loaf is practically a keto and paleo bread, however, the sourdough starter does require gluten-free grain. The trick is to have a really long ferment, which develops the flavor and loft of the bread.
The biggest trick to getting this bread to work is that it doesn’t contain eggs. It means that the loaf requires heat to create a crusty exterior which prevents it from collapsing after it is taken out of the oven. That can be a bit tricky for anyone new to gluten-free baking.
For a simpler version of this recipe, try my non-vegan gluten-free sourdough rolls.
Variations
Variety is the spice of life, or at least in this case the flavor in the loaf of bread! The structure of this bread is strong enough to support added ingredients. And the rich sourdough complements other flavors.
Here are some of my favorite additions:
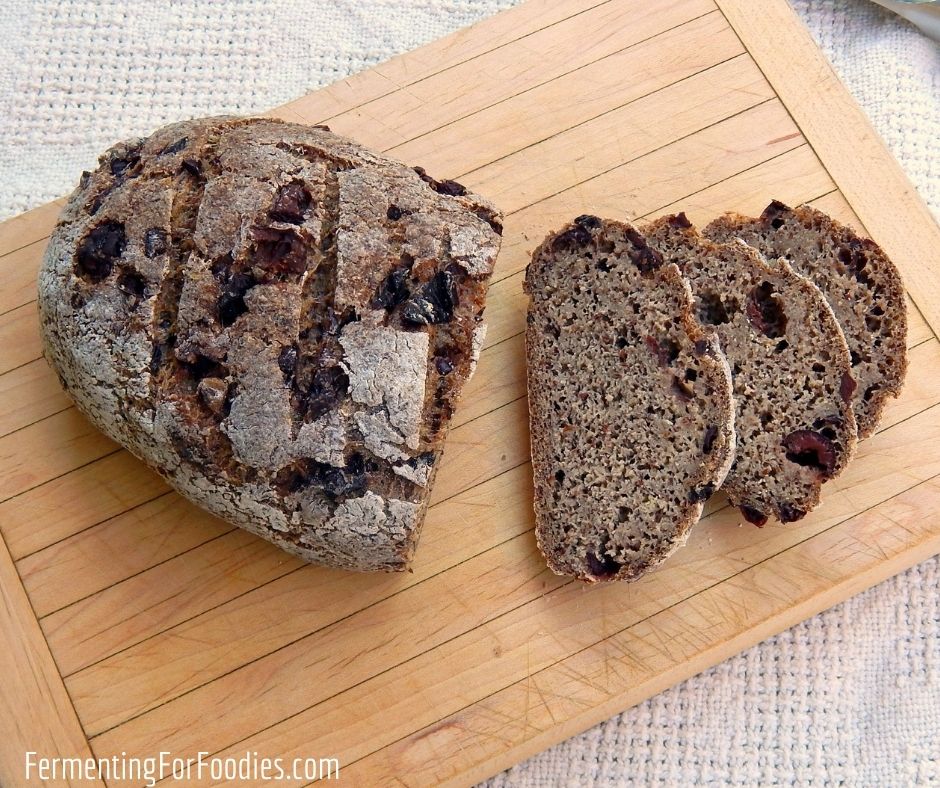
- Olive: Add 1/4 cup of diced kalamata olives.
- Multigrain: Stir in 2 Tbsp of millet, 2 Tbsp of sesame seeds, and 1 Tbsp of poppy seeds. Then brush the top of the loaf with water and sprinkle on some sesame seeds.
- Walnut: Adding in a 1/4 cup of chopped walnuts gives the bread a naturally purple hue.
- Rosemary: 2 Tbsp of finely chopped rosemary gives the loaf a burst of flavor. It makes the perfect garlic bread.
- Sweet Cinnamon: Mix in 1 Tbsp of cinnamon and 1/4 cup of finely chopped dried fruit for a sweetly-inspired breakfast bread. I recommend using currents because they are already nice and small.
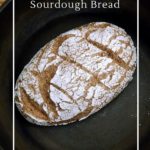
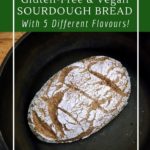
Gluten-Free and Vegan Sourdough Bread
Looking for a delicious loaf of bread? This bread gluten-free and vegan sourdough bread is packed with flavor. It only contains about 1 1/2 cups of flour, which is used to give the bread a delicious sourdough flavor. The structure is provided by high-fiber psyllium husk and flax.
- Prep Time: 10
- Cook Time: 50
- Total Time: 1 hour
- Yield: 1 small loaf 1x
- Category: Bread
- Method: Sourdough
- Cuisine: Vegan
- Diet: Gluten Free
Ingredients
- 1 cup gluten-free sourdough starter
- 1 cup water (chlorine-free)
- 1 cup whole-grain gluten-free flour (to feed the starter, see notes)
- 1 tsp sea salt
- 2 tsp xanthan gum
- 3 Tbsp ground flax
- 2 Tbsp ground psyllium husk
- See the section above for additional flavors
- 1–2 Tbsp tapioca starch for forming the loaf
Instructions
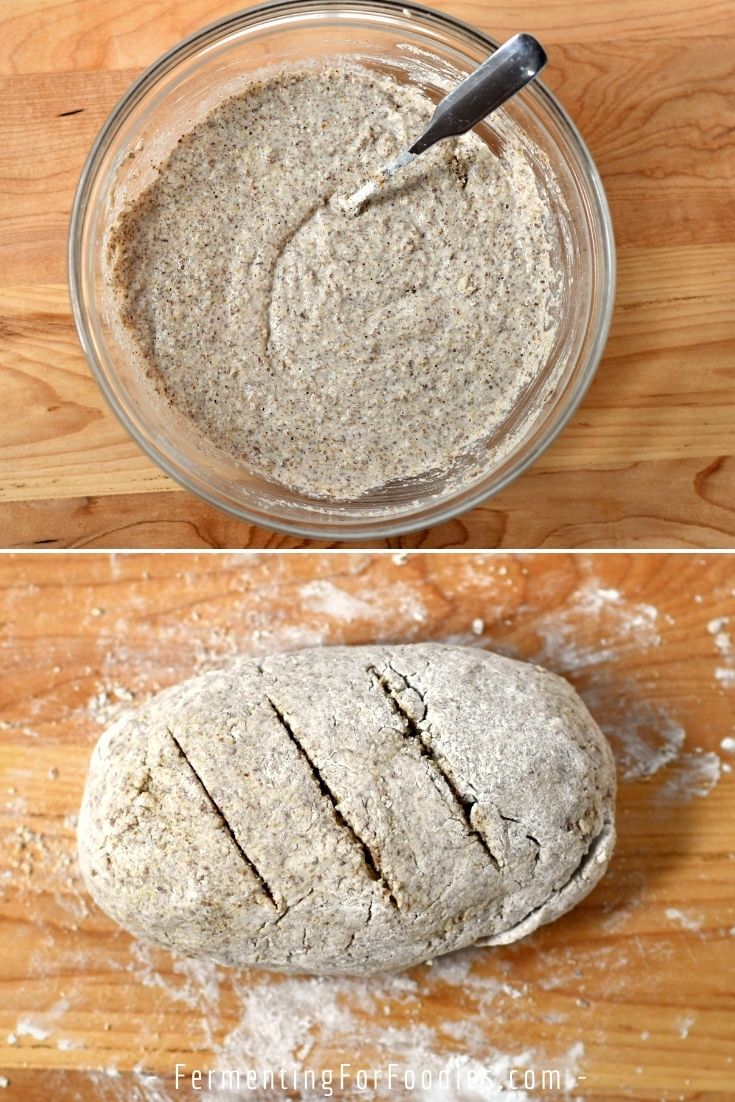
- Mix the sourdough starter with the water and the gluten-free flour. See the notes if you are new to the sourdough starter.
- Mix in the salt, xanthan gum, flax, and psyllium husk. Stir in any additional flavors at this point as well. The batter will start quite liquidy. Leave it for 5 minutes to thicken.
- Form the bread once the dough has thickened. Sprinkle the tapioca starch on the counter. Using a spatula scrape the dough from the bowl to the counter. Coat your hands in tapioca starch, then roll the dough in the starch to form a loaf.
- Leave the loaf on the counter, covered for at least 2 hours. However, this loaf will rise better if you leave it for 12-18 hours. I usually rise the loaf in a banneton or on a plate because then I can easily move it around.
- When you’re ready to bake, preheat to 450 F (230 C). When the oven is preheated, gently place the loaf on a baking stone or in a cast iron pan (with the lid off). Make several deep slices into the top of the loaf to help the rise. Bake for 45 minutes.
- Since this is an egg-free recipe, this loaf uses a firm crust for the structure. The loaf is done when the inside is cooked and the crust is firm. Test by tapping on the loaf. It should sound hollow. Remove from the oven and allow to cool completely before slicing (at least 3 hours or it might collapse).
Notes
- If you are new to GF sourdough, I recommend making a starter with buckwheat or teff since they only take 24 hours for a very vigorous GF starter.
- The sourdough starter is what really gives this bread its unique flavor. Use whatever flour you’ve been feeding to your sourdough starter for the flour in this recipe since the goal is to feed the sourdough.
- The loaf is quite small to ensure good a good rise structure. Feel free to double the recipe and make 2 small loaves. However, don’t make a single large loaf, the psyllium husk just won’t support the structure.
- To bake in a loaf tin, grease the tin and coat it with tapioca starch. Rise the loaf in the tin and bake as described above.
- This recipe was updated to prevent the issue of loaves collapsing after being pulled out of the oven. However, a number of readers prefer the original recipe. The original recipe didn’t contain xanthan gum. It had 5 Tbsp flax and 5 Tbsp psyllium husk instead.
Perfectly delicious! Thanks Emillie.
The only bread I made for years was a gluten-free vegan sourdough by Joann Farb now available at this link: https://joannfarb.weebly.com/blog/buckwheatbread. I love this recipe. It makes a heavy, delicious bread that is great sliced thin and toasted. (I didn’t follow the recipe exactly for my starter, and just stirred it all together in a bowl, and put it in an ice chest to rise overnight with one or more mason jars of hot water. It was great. However, I find your amazing sourdough bread with eggs to actually be “amazing”. It is very easy and fast to put together, and not dry or crumbly as gf recipes were in the day.
Shannon Stonger has a delicious gluten-free vegan sourdough in her book Traditionally Fermented foods that seems unnecessarily complicated, but time will tell. I am trying your recipe with great anticipation, as it is much simpler. Wish me luck.
Hope you enjoy it!
What is the finished loaf dusted with? Thanks!!
It’s formed with tapioca flour (or another starch) which is what gives it that white dusting.
Hi, can I use a rye-wheat starter and then gluten free flour? thank you!
I haven’t tried this bread with a gluten flour, however, I think it should work. Just use rye flour in the recipe because you want to feed your starter. Starter tends to work best being fed the same kind of flour. 🙂 If you bake it with rye, can you let me know how it turns out? I’m curious! Thanks.
Hi!
I followed this recipe exactly and it looked really great coming out of the oven, however, once I cut into it it collapsed and was very gummy in the middle. I put it back in the oven to bake for another 20 minutes and it got really hard on the outside and still gummy inside. What do you think I did wrong? I have another loaf really to bake and now I’m not sure what to do. The first batch was in a loaf pan but this one I’m doing free form in a Dutch oven because I thought that might have been the issue?
Thanks!!!!
Try the dutch oven, which will keep the outside from crusting early. Then take the lid off and allow it to form a crust.
Maybe turn down the oven temperature for a longer slower bake when you use the loaf pan. Then the inside will cook before it crusts. I haven’t had that problem, but if your oven is really hot, I could see it crusting early. Regardless, it is moist in the inside (just a fact of using psyllium husk) but it shouldn’t be gummy. Since there’s no eggs, the crust is what helps it to hold its shape.
Hope the next loaf comes out well! It really is our favourite bread recipe.
I have tried this recipe twice. Both times it collapsed within minutes of taking it out of the oven. First time I cooked at a lower temperature in a tin pan. Second time I used a Dutch oven as recipe states. Both times very gummy. I’m not sure whetting failing the recipe.
Hi Joy, Sorry to hear that it collapsed for you twice! I will admit that I had it collapse on me as well. However, once I got used to making sure that it had a firm crust and was cooked inside, then it worked out.
You can test it with a toothpick. It won’t be as dry as other bread, but it shouldn’t be a sticky mess.
In the meantime, I’ll play around with the recipe and see if I can provide more reliable cooking instructions. It’s a new recipe, so I haven’t had time to test what happens if someone has a warmer or cooler oven. I’ll bake this weekend and adjust the instructions ASAP. Cheers, Emillie
Hi Joy, Edited the recipe for a longer, slower cook time. I think there is an issue with not everyone’s oven being able to accurately get to 500F. I tested it this weekend and it worked great. Hopefully, it works for you!
Hi there!
If I dont not have tapioca starch, would potato starch work??
Oh also! if i dont have psyllium husk- can I use more flax??
Potato starch definitely works. However, I’m not sure that more flax would work because the loaf already has a lot of flax. Maybe try one of my other GF recipes instead? Flax would definitely work to replace the psyllium husk in this bread: https://www.fermentingforfoodies.com/amazing-gluten-free-sourdough-bread/
Hi there!
I just made the bread and it’s delicious!! Such an amazing crust. I have a question- my bread inside felt very dense. I used buckwheat. Is that just because of the flour I used or maybe I didn’t let the starter sit long enough?
Thank you!
This is quite a dense bread. There’s no egg or additional leavening to give it loft. In that sense, it’s the most traditional GF sourdough bread on my site. You could let it rise for longer or add a bit of commercial yeast to give it loft. If you wanted to add commercial yeast only use 1/4 tsp. If you’d like to try a similar bread with egg in it, try my gf sourdough bun recipe, which is a variation on this recipe. Currently working on a pizza dough version, which I’ll post as soon as I’ve perfected it. Cheers!
Hi Emilie,
I tried this recipe with oats, It was an epic fail. Have you done it with oats before?
I haven’t made it with oatmeal, however, I have made it with oat flour. It is a tricky recipe, and really requires the exact right amount of heat and cooking time. The crust of the bread is what gives it shape. If the bread is undercooked, or the crust is too soft, then it collapses. This is because it doesn’t contain any eggs. I have been trying to make a vegan GF bread for years, that either wasn’t dense nor filled with starches. Good luck!
Hi, should the starter be at the peak of activity when you use it to bake or is it okay if it has risen and fallen already? Thank you!
It’s best to be at the peak, however, it should still puff up in the oven, as the heat will activate the yeast some more. The long ferment on this loaf is to develop flavour more than the loft. Good luck!
Hello, I made this twice with the same gummy inside problem. (Once as instructed and the second on a pizza stone) It looked perfectly wonderful as I took it out of the oven. I thought it could be due to Arrowhead Mills Organic GF flour mixture until I read the other comments. There was a giant air pocket under the crust with spider like filaments to the gummy deflated interior. I cut it in half, gutted it and baked the scraped out gooey mess along with the split open crusts – I had to salvage it. Tasted great with homemade pesto.
Not sure how to proceed. Any suggestions? Thanks!
I’m not sure why that happens, but it has happened to me too. Sometimes, instead of getting small bubbles, I get one large bubble. It still tastes good! I have noticed that I get a better distribution of bubbles when I add in kalamata olives. Maybe it just needs something to break up the structure.
I’m going to make another few loaves tomorrow to see if I can make it a more reliable recipe by adding in things like sunflower seeds or sauteed onion. Sorry! Generally, I don’t post recipes that haven’t been well tested… and I thought I had this one down perfect. (Seriously spent a year developing it.) When it works it’s amazing… then there’s the weird giant bubble issue…
I made a few loaves today… all of them worked perfectly, with a nice even crumb. I added in pumpkin seeds in one of them, which I think helps to break up the air bubbles. I’ll test it a few more times to test what sort of added ingredients are weighty enough to break up the bubbles, then I’ll rewrite the recipe. In the meantime, try adding 1/4 cup of something like pumpkin seeds or olives. 🙂
Hi! I only had enough psyllium husk to half this recipe and attempt a baby loaf. I also am using a pan since I don’t have a Dutch oven. Would you still recommend I bake at 400 degrees and just bake for a shorter time? Or what did you mean in the other comment by a longer slower bake? 375?
This bread really risks collapsing… (no eggs) so bake until the outside is really crispy and the inside is cooked. I’m not sure exactly how long that would be. Maybe start with 40 minutes, then check?
I tried this recipe, the taste of the crust of amazing . Yet it’s gummy inside . I did bake at 500 & 400. My oven tends to heat up more . Making another loaf at 400/450. I will keep you posted
I often just turn off the oven and let the loaf sit in there while it cools. The flavour is amazing, but it is hard to get a consistent texture.
I recently discovered your blog and really appreciate your simple instructions on gluten-free sourdough. I am wondering if you think I could substitute glucomannan for the psyllium husk in this recipe? Thanks in advance.
I’ve never baked with glucomannan before. Do you know how much water it absorbs? Psyllium husk is fairly similar to flax… though if you used just flax this would be one dense bread!
If you end up trying it with glucomanna let me know how it works!
Hi Emillie,
I’ve been looking for a vegan nut-free gluten-free keto sourdough recipe and came across your recipe.
I was wondering if you’ve ever tried it with lupin flour? I watched a lupin flour sourdough starter video (I don’t sugar coat) which has me inspired, however the sourdough bread recipe used vital mix gluten.
Also what happens without the tapioca starch?
I’d welcome your thoughts.
Regards
Hum… I’ve never used lupin flour before. However, you could try it in this recipe. It’s a fairly dense bread anyway, so it probably won’t make a difference. The tapioca starch is just for forming the loaf. It absorbs extra liquid well, forming a nice crust. You could use any flour you want to form the dough. It just might be a bit stickier depending on how good the flour is at absorbing liquid. Let me know if lupin flour works!
Hi Everyone, I edit the recipe and tested it 4 times, using different flours and it’s pretty robust. It still needs all the flax and psyllium husk, but it should work with any kind of flour or added ingredients. Enjoy!
I try searching for “Gluten free flour mix” as it is often listed in the ingredients for gf bread. But, I am unable to find it. What type of flour is in the gluten free flour mix? Thank you!
Hi, For some reason my website glitched and my GF flour mix page wasn’t working yesterday. I noticed the glitch this morning and fixed it! However, for this recipe, I recommend using just whole grain flour and not a flour mix. It already has a lot of other binders and doesn’t need the extra additions in the GF mix.
I’ve made this bread twice, accidentally not following the directions properly both times and both times I had a beautiful and delicious loaf of bread so I had to leave a review. This is an excellent recipe but I think it works really well with either more psyllium seed husk or less water. The first time I accidentally only added a half cup of water and my dough was really thick! Like, immediately upon stirring it together it was thick enough to basically form itself into a loaf. I was worried it wouldn’t have enough liquid to ferment so I let it sit on the counter for a full 24 hours. I then baked it as directed in a Dutch oven and was rewarded with a sour and incredibly delicious, moist but firm loaf of bread. The second time I made it I followed the directions properly and ended up with a quite wet batter like is shown in the pictures but didn’t quite trust it so I added an additional tablespoon of psyllium seed husk. This gave me a slightly softer dough than the first bake but I wanted to see how it went. I also didn’t have anymore buckwheat flour, which is what my starter is, so I used half brown rice and half oat flour. I was worried it wouldn’t ferment but I left it for 18 hours this time and it looked great before I baked it. When baking it this time, however, I forgot to turn the oven down to 400 when I removed the Dutch oven lid and baked it the entire time at 450. I was rewarded in my mistakes and substitutions with another delicious, crusty, firm but moist loaf of bread! I’m convinced that if you add a little extra psyllium seed husk or a little less water and create a firmer dough, this recipe is actually really forgiving. I’m so so so grateful to have this blueprint, being someone who has to eat a vegan, gluten free, alkaline diet and can’t have yeast. Don’t be afraid to have a drier dough or substitute the flours if you have a healthy starter. Thank you so much for this recipe!!!
Great! I actually just updated the recipe last week, so hopefully, the water ratio is fixed. I also added a bit of xanthan gum… mostly to fix the issue that occurred with some readers, where the loaf collapsed after coming out of the oven. I baked bread 3 times last week just to make sure it was fully reliable. But also because it’s delicious and a great way to get a dose of fibre. Enjoy!
Hi, did you change anything else when you added the xantham gum?
I decreased the flax and psyllium husk to accommodate for the extra binder. Glad you liked it!
Oh, I thought so! I just went ahead and made it without the xantham as it had worked for me before… but the dough looked a bit more wet and i remember much more psyllium. Will see how it comes out of the oven! If you don’t mind, do you remember the measurements you previously had?
Thanks!
Yes, I used 5 tbsp each of psyllium husk and flax. However, I had trouble always getting the bread to keep its shape. About half the time it would deflate, and I just couldn’t figure out any other way to stabilize the recipe. Hope that your loaf turns out!
Love the recipe can’t wait to try it. Was curious to know that if I wish to add some flavours mentioned here at what point should they be added in the recipe?
I add my flavours with the psyllium husk. 🙂
This is the first gf vegan bread I’ve made that isn’t a brick. I did an olive and walnut combo.
Wow! Sounds delicious. I’ll have to try that combo next time. Thanks for sharing.
Can I substitute chia seed for the flaxseed?I Ihave an allergy to flax.
I haven’t tried it. But ground chia and ground flax are fairly similar. If you do try it, let me know how it goes! Thanks!
Hi!
I used your older recipe, and that worked better for me.
Do you still have those measurements handy? I found my loaves were better with that recipe.
Thank you!
The old recipe didn’t have xanthan gum, instead, it had 5 Tbsp of ground flax and 5 Tbsp of psyllium husk. I loved it too… but so many readers where struggling with collapsed loaves that I had to change it. Cheers!
hey there, grateful for the texture, just wondered if you can use this recipe in a bread machine that’s specified for GF bread?