

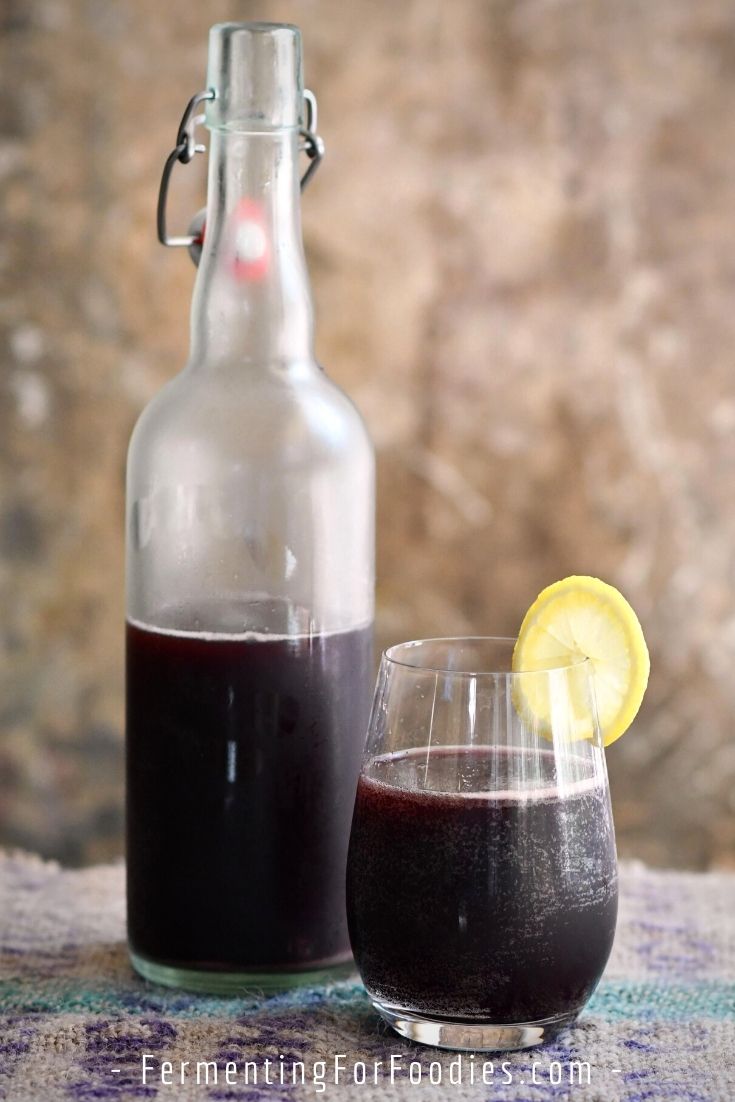
Fruit juice cider was my first attempt at home brewing. It’s a sparkling and flavorful hard cider that is so easy to make that it is still one of my favorite recipes. All that is required is a bottle of juice and a packet of yeast!
Normally homebrewing requires sanitation, precision, and a large fermentation vat. Depending on what you want to make, it also involves a small chemistry set of sulfites, pH testing strips, a hydrometer, etc.
This simple recipe for fruit juice cider only requires a bottle of juice and a packet of Champagne yeast (which is available at most winemaking stores).
Tips and Tricks for Brewing In a Juice Jug
There are only a few tips and tricks for making fruit juice cider:
- Add the packet of yeast directly to the bottle of juice, so you don’t have to worry about sanitization.
- Make sure the juice is preservative-free, and not from concentrate. Preservatives will slow down the fermentation.
- Use juice that comes in a glass jar because metal, plastic, or wax interiors may deteriorate during fermentation. If you want to use Tetra Pak juice, then transfer it to a sanitized bottle for fermenting.
- It’s important to keep out unwanted yeasts and bacteria. Airlocks are cheap and easy, just buy a bung that fits the juice jug (see below).
- Alternatively, you can make fruit juice hooch by using a balloon with a single pinhole pricked in it as an airlock. The pinhole will allow CO2 to escape without letting anything in. Just be sure to wash the inside of the balloon first to get rid of the talc. (I used a balloon my first time, but I’ll admit a $2 airlock is definitely nicer).

How to Bottle Fruit Juice Cider
This recipe provides the simplest method for finishing fruit juice cider. That’s because it’s designed for beginners, who might not have the sanitation chemicals, bottles, or siphon necessary for bottling.
Simply putting the cap back on the juice bottle will work! However, it won’t allow the cider to fully carbonate as it won’t have an air-tight seal.
Here are the additional steps required to prime and bottle the fruit juice cider. If you want more details about any of these steps, check out my basic cider how-to guide.
- Use either flip-top beer bottles or plastic pop bottles that can handle the carbonation.
- Start by sanitizing the bottles and the auto-siphon.
- Prime the carbonation by mixing 2 Tbsp of white sugar in 1/4 cup of boiling water. Stir to dissolve the sugar. Then mix the sugar water into the cider.
- Using the siphon, fill the bottles, leaving all the sediment at the bottom of the juice jug.
- The bottled cider will need to ferment at room temperature for another 1 week until it is carbonated.
- Test carbonation by either squeezing plastic bottles or popping the lid on glass bottles. Once it’s carbonated, store the cider in the fridge.
- Because this is a sulfite-free recipe the cider is not shelf-stable and will continue to ferment, even in the fridge. So if you like sweet cider, finish drinking it within 1 month. Otherwise, enjoy it within 2 months.
Simple Fruit Juice Cider
It’s easy to make cider from a bottle of fruit juice. This simple recipe results in a sweet and sparkling hard cider that is so much better than Grandpa’s hooch. All you need is a bottle of juice and a packet of yeast!
- Prep Time: 10 minutes
- Total Time: 10 minutes
- Yield: 1 gallon 1x
- Category: Beverage
- Method: Fermented
- Cuisine: American
- Diet: Gluten Free
Ingredients
- 1 gallon of 100% clear fruit juice (preservative-free)
- 1/4 tsp champagne yeast (1/4 package)
- 3 Tbsp sugar (optional, see notes)
Instructions
- Pour 2 oz of juice out of the bottle (to prevent overflow during fermentation).
- Follow the instructions of the packet of yeast and add it to the juice jug. (Some require prehydrating, others can be added right away).
- Add the sugar, then cap the bottle with an airlock. Agitate the bottle slightly to make sure the yeast is mixed in. (See the section above for advice about using a balloon instead of an airlock).
- Place the bottle somewhere dark to ferment for 3 to 5 days. A closet or a kitchen cupboard is perfect.
- After 5 days the bubbling in the airlock should have slowed down.
- Remove the airlock and replace the original cap. Alternatively, bottle the cider for proper carbonation. See the section above for details on how to bottle homemade cider.
- Store the jar in the fridge to finish fermenting.
- Every few days open the cap to release the build-up of pressure in the bottle. The cider is finished when it is sparkling. The cider will become less sweet and more alcoholic as time goes on. So taste it every 2-3 days, and enjoy it when the flavor is to your liking.
Notes
- Choose clear fruit juices, like grape, apple, or pear. Don’t try this recipe with orange juice or pineapple juice because these juices cause the yeast to become stringy and unappetizing.
- Without any added sugar, the maximum alcohol content of most juices is around 3-6%. Adding sugar increases the potential alcohol content. For example, adding 3 Tbsp of sugar will increase the alcohol levels to around 5-10%. However, the original sugar content of your juice will also make a difference. The best way to determine how much sugar to add is to use a hydrometer to measure potential alcohol content.
- If you don’t add sugar, cap the juice after 3 days to ensure you have enough natural sugars to carbonate the drink. Otherwise, let it ferment for 5 days.
- If you want a dry, wine-like beverage, keep fermenting until the airlock stops bubbling. The resulting beverage won’t be sweet or carbonated.
- I haven’t provided nutritional information for this recipe because it will depend on the type of juice and how long it is fermented. Homemade cider will range from very sweet, not at all sweet depending on when you decide to drink it.
How much fruit juice? Just ‘bottle of fruit juice’ doesn’t say enough! 8 oz., 16, 32, 64? If it doesn’t matter, please be more specific about That! Thank you
You could use anywhere from a 32 oz bottle up to 4 gallons of juice! The yeast might be a bit faster with a smaller amount of juice, but they will consume all the sugars either way.
Hey, i was wondering, if i use a 64 oz bottle of juice, would i need to use 2 oz of yeast? and what brand?
Im new to fermenting and could use all the help i can get
Half a package of yeast should be enough. I just sprinkled yeast into a bottle of apple juice, should have apple cider in about 2 weeks time. I use Levain champagne yeast. I do recommend an airlock over the balloon. Just get something that will fit in the mouth of your juice jug. They only cost about $1. Good luck!
Depending on acidity, you would need between 1-3 grams of yeast. A packet of champagne yeast is 5 gram which is sufficient to ferment up to 4 gallons but it takes considerably longer.
For cider and grape juice, I use 1-1.5 grams of yeast (about 1/8 of a teaspoon). For cranberry wine, I up the ratio to 2.5 grams of yeast.
As to the balloon vs airlock, I’ve tried both – the airlock is much simpler and less messy and reusable. I put a little bit of alcohol into the airlock instead of water to be sure no bacteria or mold gets in.
Interesting. The alcohol in the airlock is a great idea. Thanks for sharing!
you say 1/4 TSP (1oz) of yeast big difference could you tell me
Sorry, typo. I’ve fixed it.
what if you dont have an airlock? what would happen if you cap it straight away?
It would over carbonate and potentially break the bottle. Even flip-top bottles won’t be able to handle the initial ferment. You can also use a balloon. Give it a good rinse (to remove the talc from the inside). Then poke a single hole in it with a needle. Stretch the balloon over the mouth of your jug. It will act as an airlock for you… letting the gas escape from the hole.
Good luck!
Hi just wany to ask i did the pricess as described but juice looks milky and does not ot taste the same also have residue at bottom. . Can i drink it like that.
Hi, The residue on the bottom is typical. It’s the yeast that is fallen out of the ferment. You’ll want to leave that behind when you bottle it. The flavour will change. It will be sparkling and less sweet. It should taste like cider.
I’m concerned about the milkiness. What type of juice did you use? Juices like orange, pineapple or smoothie juices go cloudy because of how they react with the yeast. If you used a clear juice (apple, grape, etc.) and you have cloudiness, then I would be concerned about contamination and wouldn’t drink it. Alternatively, you could wait a few days and see if more yeast drops to the bottom. Maybe it was just a really active ferment with a lot of yeast. Good luck!
I have never made anything but have 3-5 gallon and 3- 6.5 gallon Carboys. I am picking up approximately 30 gallons of fresh squeeze post juice we picked off our tree. Please please offer suggestions. The cider sounds great but to much to consume. Will be freezing the juice till I know what I’m doing. I would like decent alcohol content but sweet Rotherham wine or mead. SUGGESTIONS????
Hi Dan, I have a few other wine/cider recipes. I can’t tell what kind of fruit you have, and I had to google Rotherham wine (it came up with a store). 🙂 Do you have apple juice? I recommend starting with this post, it might help you. https://www.fermentingforfoodies.com/homemade-cider-wine/ Most of my recipes can be turned into cider or wine. But I will admit, they are mostly based on the fruit that I have easy access to. My part of the world doesn’t grow a lot of grapes. Cheers!
Hi I’m fermenting bottle sweet apple cider. Only 32oz but when I added a little brown sugar and heated to 165d(f) a film of ….? Fiber…? Looking a bit like tissue paper formed in it. What the heck was that?
Thanks,
Spaz
Hum… it could be kahm yeast. https://www.fermentingforfoodies.com/kahm-yeast-mold/ Though if the film came from heating it, it probably has something to do with sugar crystallization. I’m not sure as I haven’t tried heating fermented cider. Cheers, Emillie
Hi, the cider was just store bought sweet apple juice not yet fermented. All natural, “Tree top 100% pure pressed honeycrisp apples nothing else”
Thanks
Hum… did the white scum come from fermenting? Then it is quite likely kahm yeast. Cheers, Emillie
Hi Emillie – Where do you get an airlock for $1? The one that was linked was a pack of 3 for $20. I’m assuming my fermenting jar lids wouldn’t be appropriate for this purpose…
Thanks!
Jessica
Sorry about the link! They are “universal links” which means they show different sellers depending on where you’re located. I make my links in the USA because that’s where most of the website visitors are from, so the Canadian links are less reliable. You should be able to get them at a local UBrew store for less than $5. I bought mine for $1 a few years ago, but the cost of everything keeps going up, so I’m not exactly sure how much they are now. The store I always use to go to is closed, but there are two UBrew stores near uptown. The yeast I bought for this project came from Blanchard St. Winery. Hamilton Hops and Grapes is another option. They should have a bunch of bung sizes, so take your jar to get the right size.
You could also use a fermenting lid. The thing about cider is that it BUBBLES a LOT. So an airlock makes it easy to release the gas and you can easily see when the fermentation slows down. If you’re not sure about whether cider and winemaking are for you, then feel free to try it in your usual fermenting jars (just release the pressure daily). But if you think you might get into winemaking, then having a few airlocks is a good idea.
Cheers, Emillie
CIDER ALLWAYS contains APPLE JUICE. If it does NOT include Apple Juice it’s fermented fruit juice Call it what you like but it’s NOT Cider .
My airlocks for fermentation jars cost around £GB0.50 each or $US0.60. If you are using a screw top all you need to do is unscrew the top by a thread or so!!. Plastic ‘High Pressure’ COLA bottles are pretty much inert and resistant to alcohol and acidity. There really is no need to over complicate matters and I’ve used 5 litre water bottles as well.
I often make fermented vegetables by simply not tightening the lid. That’s a good alternative for anyone unable to find an airlock that fits. Thanks for the suggestion. Cheers!