

Are you looking for a delicious gluten-free pierogi? Skip the freezer section of the grocery store and make your own! Homemade gluten-free pierogies are a flavor-packed meal that is well worth the effort.

This recipe is based on my husband’s mother’s traditional vareniki recipe. As a Doukhobor, homemade vareniki is a big part of his cultural heritage. So I knew I had to create a gluten-free version for myself!
It pretty much follows the typical recipe, using an extra egg and less milk to make sure the dough is strong enough.
I also form them a bit differently, since they’re at risk of tearing.
A rainy day activity
I love making pierogi on a rainy afternoon. We put on some loud music and stuff a double-batch of pierogies as a family activity. Homemade gluten-free pierogi freeze really well, so more is always better.
How to Fill a Gluten-Free Pierogi
Regular pierogi are easy to fill. Gluten naturally stretches around the filling.
Gluten-free pierogi require a bit more attention to detail. It’s a balance between making the dough nice and thin, but not tearing it.
Never fear! My kids have been filling pierogi since they were preschoolers! The secret is to form each pierogi separately.
Here’s the basic rundown on how to fill a gluten-free pierogi.
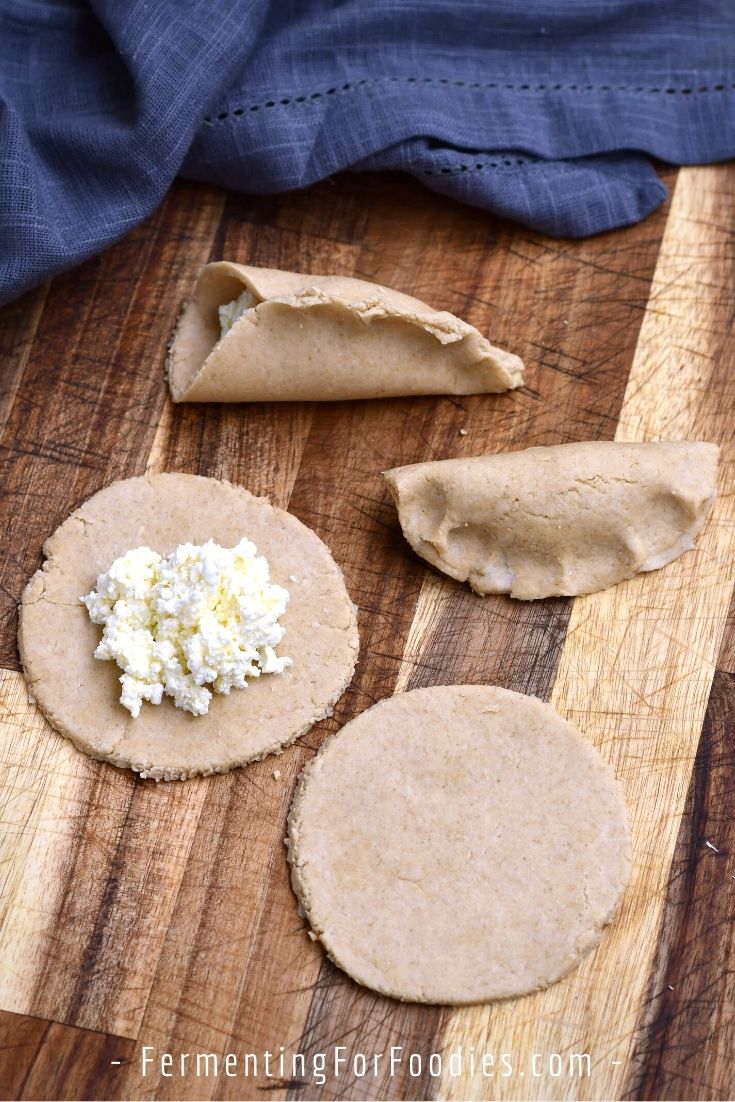
- Start with about 1 large tablespoon worth of dough. Flatten the ball against a table, then roll it out until you have a circle about 10 cm (4 inches) in diameter. If you have a biscuit cutter, you can use that to make a perfect circle.
- Place 1 Tbsp of filling in the center of the circle. I recommend flavorful fillings that aren’t too moist, like dry curd cottage cheese.
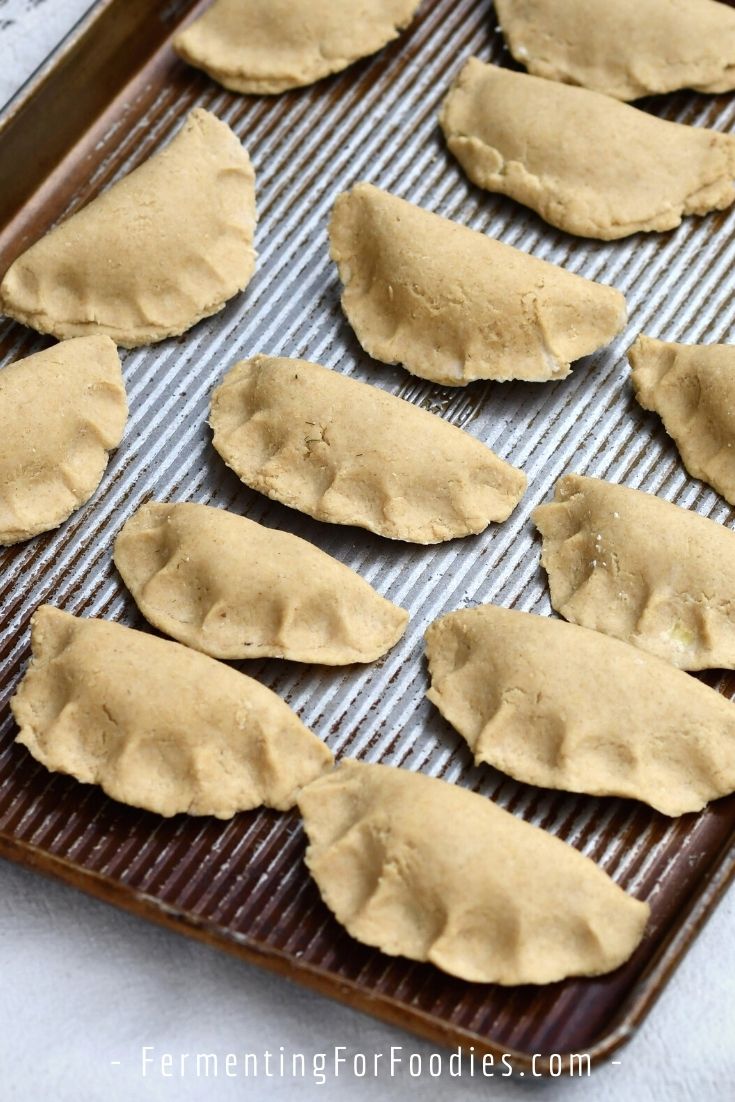
- Fold the dough around the filling and press it closed along the open edges to form a semi-circle shape. If you have extra dough trim it away. Feel free to make a simple straight edge or a scalloped edge.
Gluten-Free Pierogi

Gluten-free pierogi are a delicious indulgence that are well worth the effort. Stuff them with a variety of different flavors, and freeze the extras for a quick, weeknight meal!
- Prep Time: 1 hour
- Cook Time: 10 mins
- Total Time: 1 hour 10 mins
- Yield: 24 1x
- Category: Main Dish
- Cuisine: Russian
- Diet: Gluten Free
Ingredients
- 2 1/2 cups gluten-free flour mix (see notes)
- 1 tsp xanthan gum (if the flour mix doesn’t contain xanthan)
- 1/2 tsp sea salt
- 2 eggs
- 2 Tbsp extra-virgin olive oil
- 1/4 cup milk + 4 Tbsp (as needed)
Instructions
- Mix the flour, salt and xantham gum in a large bowl. Stir in the eggs, olive oil, and 1/4 cup of milk. If it seems dry add a bit of extra milk. The exact amount of liquid will depend on the type of flour you’re using.
- Kneed for 5 minutes to get a nice smooth dough. Cover with a damp towel, and let rest for at least 30 minutes, while you prepare your fillings.
- Fillings are a such a big part of pierogi that I have a whole post dedicated to my 10 favorite fillings. One batch of pierogi needs about 3 cups of filling
- With gluten-free pierogi, it’s easiest to make them individually. They don’t need to be pretty, they just need to be sealed to keep the filling in. See the section above fore detailed instructions on how to fill gluten-free pierogi.
Cooking
- Bring a large pot of water to a boil.
- Gently drop 5 to 8 pierogi into the pot. Avoid crowding them or they will stick together. Boil until they are cooked through and float, usually 5 minutes.
- Scoop them out with a slotted spoon and place in a bowl to drain. After a minute, move them to a second container and coat them in oil or butter to prevent sticking.
- Either keep them warm in the oven or pan-fry them with onions.
- Serve with homemade sauerkraut and sour cream.
Notes
- Either use a store-bought flour mix or follow make your own. I like using my bread flour mix which contains some protein and not too much starch. I find that starch makes pierogi dry and tough.
- Replacing the milk with milk kefir or buttermilk will add to the depth of flavor. And gluten-free doughs need as much added flavor as possible.
- Freeze your pierogi before cooking on a non-stick cookie sheet. When they are frozen (after 2-4 hours), they can be stored in a zip-top bag in the freezer for your own frozen pierogi dinners! Cook from frozen by boiling as described in the recipe. Don’t defrost them ahead of time as the dough will be very sticky and hard to manage.
I’ll absolutely try, Em, thank you so much
Hope you like them! It’s all about the filling.
Hello Emillie
I don’t see your gluten free flour recipe. I’m not very good using Pinterest. Perhaps I have to search for it
LA
Did you find it? Should be able to search for it on my site.
I loved the dough! I used a Full fat lactose free milk and it worked a treat! I made a full batch GF and LF. Half potato, Tasty Lactose Free Cheese. The other half was potato, sauerkraut and bacon. Sautés in nuttelex and onions and topped with LF sour cream- yummy!!!
Great! Glad you enjoyed it! Also good to know that it works with Lactose free milk. 🙂