Hard Apple Cider From Juice
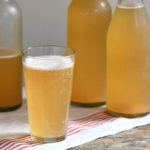
Using store-bought apple juice is the easiest way to make hard apple cider. This simple recipe is so delicious and easy that it’s perfect for beginners. Best of all, homemade apple cider is sulfite-free!
- Prep Time: 15 minutes
- Total Time: 15 minutes
- Yield: 1 gallon 1x
- Category: Alcohol
- Cuisine: British
- Diet: Vegan
Ingredients
Units
Scale
- 1–gallon jug of apple juice (see notes)
- 1/4 package white wine yeast (Lalvin EC 1118)
- 1/4 tsp yeast nutrient
- 1 cup sugar (optional)
- 2 Tbsp white sugar or dextrose (for priming)
- 1/4 cup water
Instructions
- Be sure to sanitize anything that is going to touch the cider. If you are fermenting in a store-bought jug of apple juice, then you will only need to sanitize for racking and bottling.
- Remove 1/2 cup of juice from the jug. This will leave enough room to prevent the fermentation from bubbling over. I recommend testing the sugar content of your apple juice using a hydrometer. It needs to be at least 1.050. Feel free to add up to 1 cup of sugar, as needed. This will increase the potential alcohol content and/or sweeten the cider.
- Add the yeast and yeast nutrient. Put the cap back on the bottle of juice and give it a good shake to mix everything up. Remove the lid and top the bottle with an airlock.
- If you are using unfiltered apple juice, then you will need to rack the cider to a clean jug after 1 week. If you are using filtered apple juice, then racking isn’t necessary.
- Allow the cider to ferment for 2-4 weeks (1-3 weeks after racking) before bottling. Exactly how long you leave the cider to ferment will depend on your personal taste. If you like sweet cider, bottle it after 2 weeks. Wait 4 weeks for a dry cider.
- To prime the carbonation, mix 2 Tbsp of white sugar or dextrose in 1/4 cup of boiling water. Stir to dissolve the sugar. Add the sugar water to the cider just before bottling.
- Leave the bottled cider to ferment at room temperature for another 5 to 10 days, until it is carbonated. Store the cider in the fridge and enjoy it within 2 months. Because this recipe is a sulfite-free recipe the cider is not shelf-stable and it will continue to ferment, even in the fridge. So if you like sweet cider, drink it within 1 month.
Notes
- If you are using homemade apple juice, you will need to pasteurize it to prevent contamination from wild mold, yeast, and bacteria. To pasteurize the juice, bring it to a boil and simmer for 5 minutes. Then pour into the fermenting jug and allow to cool to just above room temperature before adding the yeast.
- Don’t use apple juice that contains additional sugar, preservatives, or additives. All you want on the label is juice and Vitamin C (ascorbic acid).
- Don’t use juice made from concentrate.
- Feel free to use juice that is a mix of apples and berries. Avoid citrus, bananas, and tropical fruits which don’t ferment as nicely. (They tend to make the yeast become stringy, which isn’t very pleasant).
- A hydrometer isn’t necessary, however, it’s the easiest way to test how much sugar is in the apple juice and when it is ready for bottling. Otherwise, you can just guestimate using the recipe.
- I like to use brown sugar, which adds a depth of flavor, however, white sugar is fine as well.
- Be sure to use bottles that can handle the buildup of carbonation. Either plastic pop bottles or flip-top beer/cider bottles. Test for carbonation by squeezing on a plastic bottle or popping open one of the flip-top bottles.