Pear Cider and Wine
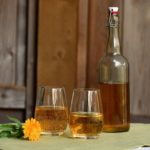
Here’s how to turn whole pears into cider and/or wine. This recipe uses yeast nutrients rather than sulfites to control the length of fermentation. The resulting pear cider is deliciously sweet and light tasting. Pear wine is a rich dessert wine.
- Yield: 5 Liters 1x
- Category: Alcohol
- Method: Fermented
- Diet: Vegetarian
Ingredients
Units
Scale
- 5 lbs of ripe pears
- 18 cups of filtered water (chlorine-free)
- 3 lbs of sugar
- 2 1/2 tsp acid blend (or 2 lemons juiced)
- 1 tsp of fresh lemon juice (in addition to the acid blend)
- 1 tsp yeast nutrient
- 1/4 tsp tannin (optional, to add body)
- 1 packet wine yeast (LALVIN 71B-1122)
- 1 tsp yeast energizer (for wine, see notes)
Instructions
- Follow the basic wine-making steps, including sanitation of ANYTHING that is going to touch the pears. (See the section above if you are new to cider and winemaking).
- Wash the pears. Cut them in half and remove the core and any bad spots. Leave the skin on. Place the pears in a brew pot or a large stockpot.
- Boil 4 cups of water. Pour the boiling water over the pears, then use a masher to mash the pears and extract the juice.
- Bring the remaining 14 cups of water to a boil, then pour the boiling water over the mashed pears.
- Put a lid on the pot and stash it in a quiet corner of your house.
- After 24 hours, add the sugar, acid blend, yeast nutrient, tannin, and lemon juice. Stir well to mix the ingredients. Follow the instructions on your yeast package (some will require re-hydrating before use). Add the yeast to the brew pot and stir it again. Give everything another good stir after one hour to make sure it is well mixed. If you want to calculate the alcohol levels, remove some of the liquid at this point to measure the specific gravity.
- Put the lid back on the pot and leave it somewhere warm to ferment for 3-5 days. Give the mixture a good stir once or twice a day.
- After the initial ferment, strain out the solids by pouring the liquid through a mesh bag or a cheesecloth-lined strainer (sanitized). Move the liquid into carboys, top them with an airlock, and leave them to ferment in a dark location, cool for 2 weeks.
Cider
- After 2 weeks the fermenting should have slowed significantly. However, you should see some bubbling in the airlock. This is when it’s ready to bottle for cider. The exact timing will depend on temperature. The ideal temperature is 68 F / 20 C. Cooler temperatures will slow down the fermentation time. Warmer temperatures will speed it up.
- Allow the bottles to sit out at room temperature for 1 week to carbonate. Test carbonation by squeezing plastic bottles or popping the lid on glass bottles.
- Once the pear cider is carbonated store it in the fridge.
Wine
- If you’re making wine, rack the liquid to clean carboys after two weeks and add the yeast energizer. It doesn’t need to be exact. Just divide the amount between the clean carboys. The goal is to boost fermentation.
- Rack again after 3 to 4 weeks to remove any remaining dead yeast. Let the wine age for 3 to 4 months in the carboy before bottling.
- Allow bottled wine to continue aging for a few more months. The wine will taste best if it is drunk the year after the primary fermentation. (So one whole year, start to finish). I’m often tempted to sample early, but it’s always a disappointment.
Notes
- Pears are low in the nutrients and tannins needed to make a good, flavorful cider and wine. Adding tannin early in the process improves the texture and flavor, and will help preserve the wine.
- Yeast energizer helps to kick-start a sluggish ferment. Without it, the pears will only ferment into cider or a very sweet and low alcohol wine.