

A vegetable starter culture is a great way to boost vegetable ferments. It is a simple and reliable way to make sure that all your homemade fermented vegetables are packed with probiotics.

While most vegetables don’t require anything more than a good brine to naturally ferment, here are a few reasons why a vegetable starter culture can be helpful:
- If you’re new to fermenting and want to avoid any potential failure.
- The air quality in your home or neighborhood isn’t great. Pollution and/or mold issues make fermenting more difficult.
- Starter cultures are a reliable way to make low salt or salt-free fermented vegetables.
Options for a vegetable starter culture
There are a number of different options for a starter culture. It’s not necessary to pick one favorite culture and stick with it. Each culture will bring its own flavor to whatever you are fermenting.
Here are a few of my favorite options. These are all vegetable starter cultures that I use on a regular basis, so I know they are both reliable and delicious.
1. Apple Cider Vinegar or Sour Kombucha
Using sour kombucha or apple cider vinegar with a mother is a great way to add a bit of extra acidity to fermented vegetables. Used in small amounts it won’t be enough to slow down fermentation. However, they add that distinct vinegar tanginess.
I particularly like adding vinegar to fermented beets.
2. Whey
Whey from milk kefir, strained yogurt, or cultured cheeses is often used as a vegetable starter. It helps a ferment go quickly, without adding a lot of flavor.
I use it any time I want my vegetables to ferment quickly, without adding any extra flavors. For example, I use it for garlic scapes.
3. Honey
Raw honey naturally contains yeasts and bacteria that come from the microbiome of the bees. Honey-based ferments aren’t actually as sweet as you might expect, since the sugars are quickly consumed during the ferment. Even so, I use honey whenever I want a slightly sweet ferment. For example, when making honey garlic pickles.
Because of the health risks associated with the consumption of raw honey, honey fermentation is not recommended for pregnant women, children under the age of 1 year, or anyone who is immunocompromised.
4. Ginger bug
Ginger bug and turmeric bug are my favorite probiotic soda pops! I just love the flavor. So naturally, I love to use ginger bug to add a ginger flavor to fermented vegetables.
5. Brine and Commercial starters
There are several commercial starters available online. They are great for packing a lot of probiotic cultures into your ferment.
As well, leftover brine from another ferment is an easy way to kickstart fermentation.
6. Homemade vegetable starter culture
This recipe for a homemade vegetable starter culture is designed to be as similar to a commercial starter as possible. If you simply use brine from whatever you have fermenting in your cupboard, then it may only contain a few strains of bacteria. This starter packs in different strains of lactic acid bacteria.
Cabbage naturally has a variety of different types of bacteria on its leaves. However, as it ferments and sours, the brine becomes inhospitable to many strains of bacteria, leaving lactobacillus to dominate.
The trick to making a super concentrated starter culture out of brine is to stop the fermentation before it becomes too acidic for many of the bacterial cultures.
Homemade Vegetable Starter Culture
Here’s how to use the natural bacterial cultures on the leaves of cabbage to create a super-concentrated vegetable starter culture. See the section above for other options to kick-start vegetable ferments.
- Prep Time: 10 minutes
- Total Time: 10 minutes
- Yield: 1 cup 1x
- Category: Culture
- Method: Fermenting
- Diet: Vegan
Ingredients
- 1 medium-sized head of cabbage (organic is best)
- 1 Tbsp salt
- 1 cup (250 mL) chlorine-free water
Instructions
- This vegetable starter recipe also results in a very simple and basic sauerkraut. So once you’ve drained off the extra liquid, feel free to let it continue fermenting.
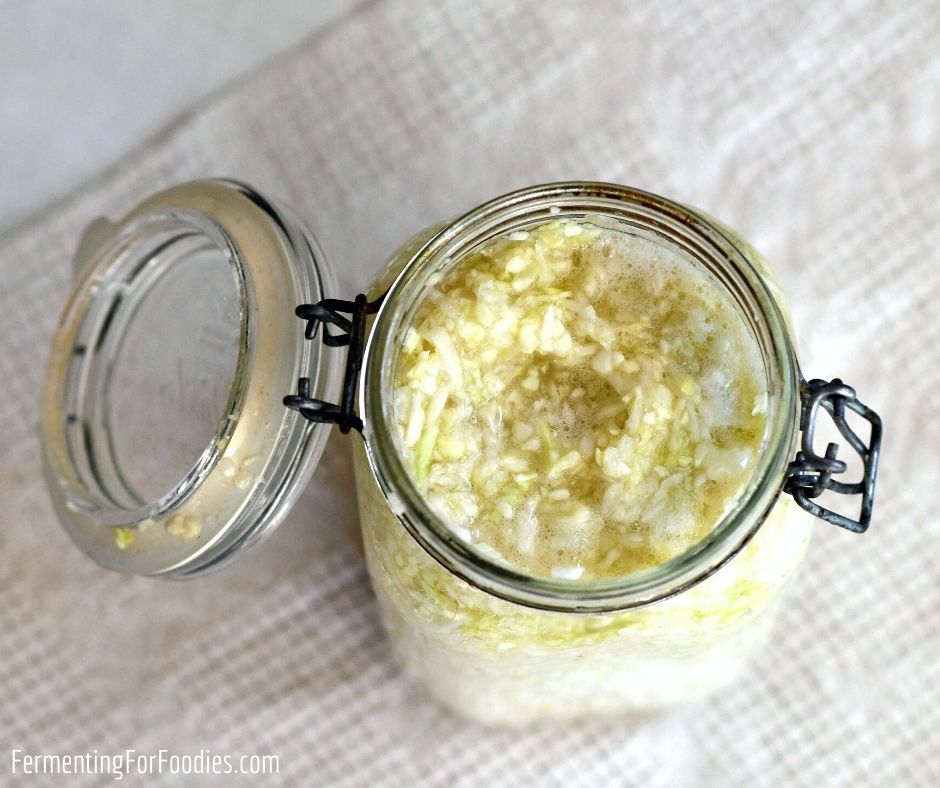
- Wash the cabbage and remove the outer leaves if necessary. Grate the cabbage into a large bowl. Toss it with the salt, then pack it into two 1-quart (1 L) jars or a 1.5 L jar. Use a wooden spoon to press the cabbage down into the jar. Leave at least 1 inch (2.5 cm) of room at the top because it will bubble a lot.
- Divide the water between the jars. It will take a minute for the water to make its way to the bottom of the jar, so add it slowly.
- Since the liquid will be used as a starter culture, it’s important to prevent contamination. Cap the kraut with a lid that will allow CO2 to escape. Fido jars or pickle pipes are perfect.
- Place the jars somewhere dark to ferment. It will start to bubble within 24 hours and remain very active for 2 to 3 days. The goal is to strain off the liquid when the sauerkraut is actively bubbling. So about 24 hours after it starts bubbling or 2 days after it was packed in the jar.
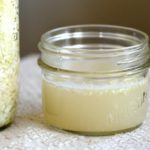
- The easiest way to strain off the brine is to use a clean spoon to hold back the cabbage while you drain the brine. I recommend pouring boiling water over the spoon before you use it to kill any microorganisms that might be on its surface, to make sure that it won’t contaminate your brine. Press the cabbage down into the jar to get most of the liquid out of the kraut.
- The remaining sauerkraut can either be left to continue fermenting or placed in the fridge for fresh and sweet sauerkraut.
- The brine needs to be frozen right away to ensure that it remains full of active cultures. Either freeze in small freezer containers or an ice cube tray. Store the frozen brine ice cubes in a zip-top bag. Your homemade vegetable starter should last for at least 6 months in the freezer.
- To use your homemade vegetable starter, defrost it in the fridge for 24 hours before use. Use about 2 Tbsp of starter per quart-sized jar of fermented vegetables.
Notes
- All cabbages should have bacterial cultures on their leaves. However, using locally grown, organic cabbage is the best way to ensure it’s teaming with lots of good bacterial culture.
- When making starters, it’s important to make sure everything is clean and sanitized. I usually do this by pouring boiling water over my tools and in my jars. That should be enough to kill most surface bacteria, yeasts, and molds.
if using the fido jars do you leave the latch unhooked so as to not have an explosion?
Proper fido jar are designed to handle the pressure of fermentation. The gasket will let the CO2 bubble out while preventing contamination. So as long as you aren’t using decorative jars… definitely latch the hook! Cheers, Emillie
The sauerkraut was just amazing! The culture worked well too. : )
have you ever thought about or tried using a little of the “juice” from a successful batch of kimchi or from a store bought kimchi who’s flavour profile you really enjoy to inoculate a new batch of kimchi? please advise. I am very tempted.
I use leftover kimchi brine to ferment vegetable sticks all the time. I love kimchi-flavored carrot sticks! You can definitely use it for a new batch of kimchi. Cheers, Emillie
Hi, thanks for all the info! I’m barely 4 days into my first ferment and my cabbage smells like sauerkraut and nothing weird is happening so I’m excited! I regularly use Apple cider vinegar with mother for salad dressings, I absolutely love it. So how much would I add to the starter culture? I want to eat lots of fermented veggies without worrying about sodium so I think after a few successful standard ferments, I will try your low sodium version using the starter.
Glad your first ferment is going well! I hope it gives you confidence. 🙂
I have a bunch of different recipes that use vinegar as a starter culture. I also just enjoy it with some vegetables. Here’s a post that includes a few different recipes that use cider vinegar: https://www.fermentingforfoodies.com/does-vinegar-stop-fermentation/ They can all be made without any salt at all! Though I usually add a bit for flavor. Enjoy!
Thank you for the links. I tasted my sauerkraut and it’s good just not done. My pickles are done but a bit soft. I’ll have to get fresher cucumbers next time and use better tannins. I can’t find in your recipe how much ACV to add (and when) to starter culture, am I missing it ?
It depends on the recipe. However, all the ACV recipes are for vegetables that include a starter culture. Salt-brined vegetables don’t work with an ACV culture as the salt kills the yeast in the ACV. I have a bunch of recipes that use ACV. Here’s an example: https://www.fermentingforfoodies.com/fermented-beets/ Or if you want to make a cabbage ferment with ACV try this one: https://www.fermentingforfoodies.com/fermented-piccalilli/
I find fermented pickles stay crisp if they are smaller and you cut off the blossom end. Large pickles always seem to soften.
Cheers!
I understand now. I’m a newbie so forgive me lol. Not sure why I was so focused on ACV (probably because I love it). The FERMENTED PICCALILLI looks great, I’ll try it sometime. I gave up on pickles for now, I think I need way better quality cucumbers and a bigger vessel. I think my sauerkraut is going well, it’s at 9 days now, already tastes good. I had some problems with weights (stupid Ball springs) that smashed my pickles. I ate some and tossed the rest (soggy).. I’m going to stick to sauerkraut for now, it seems easier. Pickles are challenging. Thanks for this website!
I’m glad that your sauerkraut is working out. I’ve never tried a spring-based weight, but I have seen them. (When I run workshops, people bring all sorts of different fermenting jars with them). Maybe try fermenting carrot sticks? I find they tend to be very reliable. Cucumbers are a bit more difficult. They need to be fresh, firm, picked before they got too big, etc. Cheers!
So my sauerkraut is done to my liking (1 Qt) after two weeks of fermenting (71-74 F). It’s crisp and tastes good. There’s not much extra brine once refrigerated, is this normal? I can only see liquid if I turn the jar on its side towards being upside down. I don’t plan to store it, I’ll eat it pretty quickly. Thanks for all your help!
Yes, that is normal. Even if you didn’t refrigerate it, the liquid will settle after fermenting, leaving the sauerkraut to appear a bit dry at the top of the jar. Enjoy!
awesome! I just started two more jars of cabbage and one spicy carrot and onion. I’m going to let the sauerkraut go longer than two weeks this time. Your website turned me into a fermenter!
That’s great! I’m glad you’re getting the hang of it. 🙂
New question: if it take fermented veggies and chop them up and put in my homemade salad (organic ACV with mother and olive oil dressing – salty and acidic) and it sits for several days (I use cabbage, onion, carrots and tomato for my salads lol no lettuce usually because it lasts longer and is crunchy, I love cabbage) will the acidity of my dressing kill the probiotics in my fermented stuff?
Hum… it depends on how much ACV. ACV actually has its own culture as well… so there is that. As long as the ACV is mixed with oil (and not too sour) it should be fine. Remember, ferments are already pretty acidic! Cheers!