Soy-Free Miso (With Split Peas Or Beans)
Want to make soy-free miso? This basic recipe can be made with other dried beans or split peas. Try experimenting with other flavors.
- Prep Time: 20 minutes
- Cook Time: 1 hour
- Total Time: 1 hour 20 minutes
- Yield: 6 cups 1x
- Category: Condiment
- Method: Fermentation
- Cuisine: Japanese
- Diet: Vegan
Ingredients
Units
Scale
- 2 cups dried split peas or beans (see above for other options)
- 8 cups of water, divided
- 2 cups koji rice or koji barley
- 1/2 cup sea salt (non-iodized)
- 1 Tbsp mature fermented miso (see notes)
- 1 tsp of sea salt (not mixed into the ferment)
Instructions
- This is definitely a recipe for a work-from-home day or the weekend. It involves a lot of waiting, but not a lot of actual cooking.
- Place the peas or beans in a large pot. Cover them with at least 4 cups of water, and leave them to soak for 6 to 8 hours.
- Pour the soaked beans into a strainer, to drain away the water. Place them back in the pot with 4 cups of fresh water. Bring to a boil, reduce the heat, and simmer until they are softening (about 45 minutes to 1 hour).
- Drain the beans, reserving 1 1/4 cups of the cooking water. Place the beans in a large mixing bowl and leave them to cool to room temperature (2 to 3 hours). When the beans have cooled, add in the koji rice, 1/2 cup of salt, and reserved cooking water.
- Wash your hands and sanitize the container(s) that you will be packing the miso into. It’s important to have everything nice and clean for this long-term ferment. See notes for more details. With clean hands, mash the peas/beans together with the rice, salt, and mature miso. It can be as coarse or smooth as you want. This will determine the consistency of your miso, so keep massaging the beans until you’ve reached a good consistency. (See the video above for my demonstration).
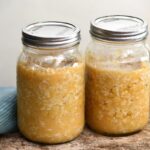
- Pack the mixture into the container(s) for fermentation. Make sure you have at least 2 inches of headroom because liquid will bubble up during the fermentation. See the notes for different fermentation container options. Sprinkle the final teaspoon of salt on top of the packed miso mixture.
- Cover the miso with a piece of plastic wrap or parchment paper. Use a weight to keep everything weighed down during fermentation. Place the container in a cool, dark location (a basement or closet is perfect). Leave it to ferment for at least 2 weeks for sweet miso, and up to 2 years for a richer, savory miso. I usually pack my miso into a few different jars so I can enjoy some of it when it’s young and leave the rest to keep aging.
- The miso will slowly produce a layer of dark brown liquid called tamari, which can be drained off after fermenting to be used like soy sauce.
- Once you’ve opened the jar of miso, store it in the fridge. It should last for several years.
Notes
- The secret to ensuring that everything ferments nicely is to sanitize the fermentation container(s) prior to use. I usually sanitize by filling my containers with boiling water to kill any surface bacteria and mold.
- Miso is a mold, yeast, and bacterial ferment. Adding a bit of mature miso provides the necessary yeast and bacterial culture. When making your first batch, it’s fine to use store-bought miso. Look for brands that are refrigerated as they will be unpasteurized and alive.
- Miso is traditionally made in large crocks, but it’s fine to use glass jars too. I don’t like plastic for this ferment, because it ferments for a really long time, and the high salt content may cause the plastic to slowly degrade.
- Want to get deep into the world for fermenting? Try making your own koji rice!