

Tempeh is a creamy, nutty, and delicious vegan protein. Learn how to make tempeh with these step-by-step instructions.
I will admit that tempeh scared me. The idea of letting soybeans grow mold was one step further than my usual level of fermentation. It was a ferment that I had been blissfully ignoring… until someone arrived on my doorstep with a package of mold and a piece of advice about how to save the spores.
So I took courage… and read everything I could on how to make tempeh… then I made my first attempt. The results were surprisingly – amazingly – incredibly delicious! I had become a master of the mold!
The flavor of homemade tempeh is completely different from store-bought tempeh. It is nutty and creamy, more like eating edamame than dense supermarket tempeh.
What is tempeh?
Tempeh is an Indonesian dish where mold breaks down soybeans (or other plant-based proteins) and binds them together into a solid cake.
The fermentation process is not only delicious, but it also turns soybeans into a complete protein that is easily digested. Tempeh is also more likely to be tolerated by those who might otherwise have trouble digesting soy.
Though this recipe is for soybean tempeh, it is possible to make tempeh with other types of beans and seeds. Try sunflower seeds, chickpeas, lentils, or other types of beans.
Tempeh has a nutty taste that is delicious all on its own. However, it can be smoked, marinated, or barbecued which allows for all sorts of interesting serving options.
Homemade tempeh advice
If you’re new to fermenting or new to tempeh here are some details that might be helpful.
1. Cleanliness:
It’s important to keep things clean as you go along because you don’t want to accidentally grow the wrong type of fungus.
2. Culture:
You might be able to find the starter at an Indonesian grocery store, however, you can also find it online. Don’t forget to make your own starter for future batches.
3. Fermenting Container:
The tempeh needs to be loosely spread out, about 1-inch (2 cm) deep, in a vented container for proper fermentation. Here are a few options:
- A vented plastic container.
- A baking pan covered with plastic wrap with holes poked in the plastic wrap.
- Wrap the tempeh in non-poisonous leaves. Hibiscus is traditional, but banana leaves also work.
- I use a ziptop bag with needle holes poked through at 1-inch (2.5 cm) intervals.
4. Incubation Options:
The tricky part about making tempeh is that it needs to be incubated at around 85-90 F.
Luckily I have Brød & Taylor Bread Proofer & Yogurt Maker which works well for all my heated ferments. Other options include incubating in the oven with the light on, near a radiator, or a hot water heater. Many people use dehydrators or an instant pot set to the right temperature for incubation. You can also use a cooler kept warm with jars of water heated to the right temperature.
The only trick is to measure the temperature as you go along because tempeh starts to self-generate heat as it ferments. The right temperature is important because if it’s too cold your mold won’t grow, and if it’s too hot it may kill the spores.
5. Dehulling soybeans
The hulls of the soybeans need to be removed in order for the spores to inoculate the beans. There are two different methods to remove soybean hulls.
- Dry method: If you have a grain mill or a meat grinder then it’s easy to dehull soybeans. After soaking the soybeans, put them through the grinder on the coarsest setting. You want the beans to be just split in half, so if they’re coming out too fine then this won’t work with your grinder. Once the beans are split put them in water so that the hulls float. Massage the beans to loosen up all the hulls, then drain off the floating hulls. You may need to massage the beans several times to make sure that you’ve gotten rid of all the hulls.
- Wet method: After boiling the soybeans, massage the beans so that the hulls fall off and the beans split in half. The hulls will float to the top, so drain off the floating hulls as you go. This is quite time-consuming, so if you find yourself making soybean tempeh a lot, then I’d suggest that you buy a grain mill.
How to Make Tempeh

Homemade tempeh is creamy, nutty and delicious. It is so much tastier than supermarket tempeh. Here is everything you need to know about how to make tempeh at home.
- Prep Time: 1 hour
- Cook Time: 20 minutes
- Total Time: 1 hour 20 minutes
- Yield: Serves 4-6 1x
- Category: Main Dish
- Method: Fermented
- Cuisine: Indonesian
- Diet: Vegan
Ingredients
- 1 lb dried soybeans (about 2 1/2 cups)
- 2 Tbsp white vinegar
- 1 tsp tempeh starter
Instructions
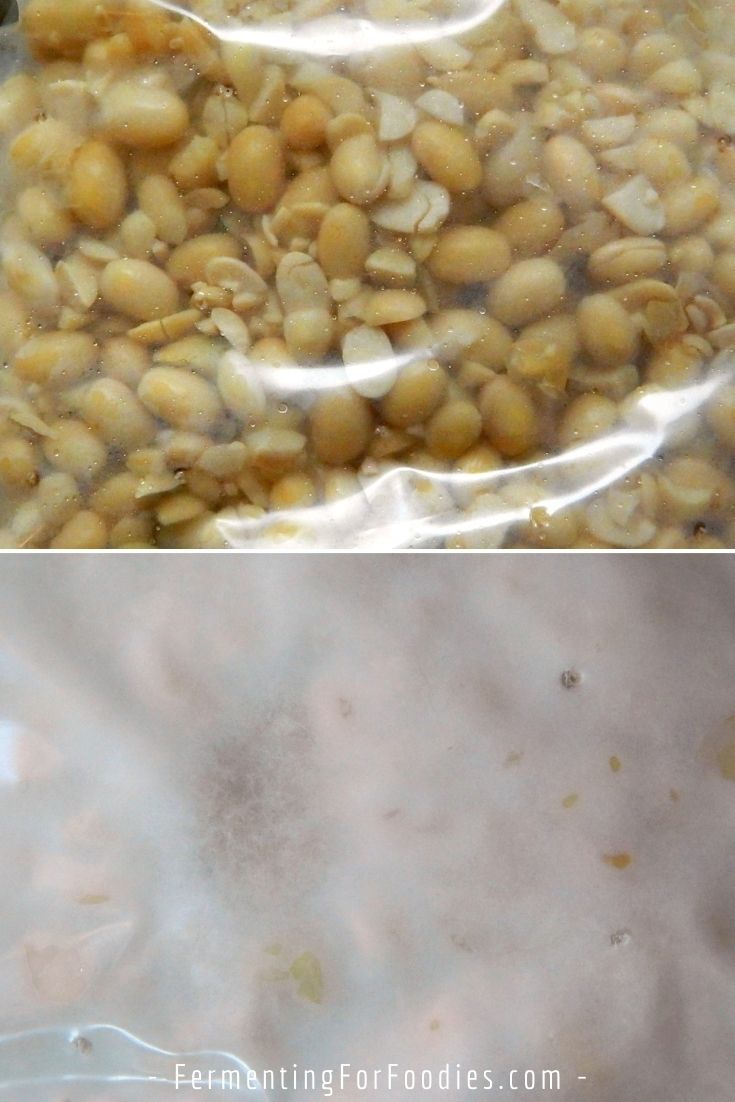
- Cover the soybeans with water and soak for 12 -18 hours. If you are using the dry method for dehulling, pass the beans through a grinder at this point. Otherwise, dehull after boiling. See the section above for more information.
- Bring the soaked soybeans to a boil and simmer until they are soft but not mushy about 1 hour.
- Drain the soybeans and gently pat them dry with a towel, then allow them to cool to just below body temperature.
- Mix in the vinegar (to lower the pH so that unwanted bacteria won’t grow).
- Sprinkle on the tempeh starter and mix well so that the beans are evenly covered by the spores.
- Fill the fermentation container(s).
- Incubate at approximately 88 F (31 C).
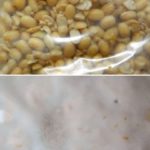
- Check the beans after 12 hours. At this point, the mold will have started to grow and the beans will start generating heat. You may need to lower the temperature.
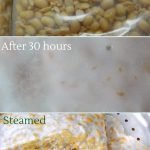
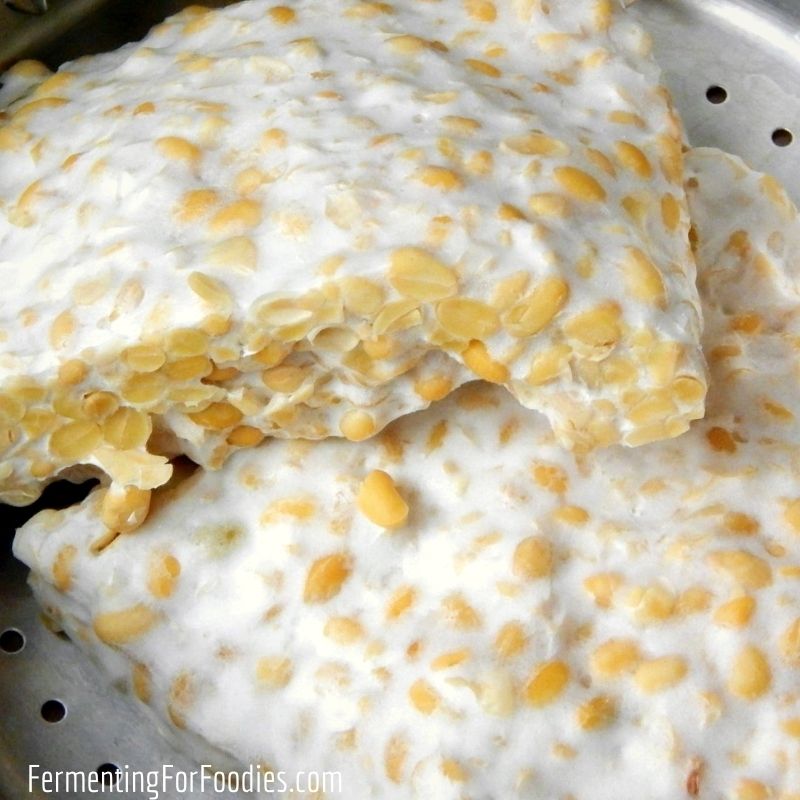
- At some point between 24 and 48 hours, your tempeh will be finished. You will know it’s done when the mold has thickened the soybeans into a single dense mass. There might be some grey or black mold spores, but you want to stop before it spores. See the photo above for a picture of the white mold.
- At this point stop the fermentation by transferring the tempeh to an airtight container and storing it in the refrigerator for up to 1 week. (See notes for cooking and freezing instructions).
Notes
- Black and gray spots may appear on the tempeh. These are the mold spores, and they are completely edible. The tempeh should smell nutty, mushroomy and it might have a hint of ammonia. If it smells bad, is mushy, or slimy then throw it out.
- Tempeh can be eaten raw, though it is generally steamed before eating. Steaming also stops the mold from spring. To steam, remove the tempeh from the fermentation container and steam for 20 minutes in a steaming basket
or a colander over a pot of boiling water.
- Steamed tempeh will last in the fridge for 2 weeks or can be frozen for up to three months.
- Looking for a way to serve your homemade tempeh? We LOVE this tempeh noodle salad.
Very helpful thank you
I accidentally added two teaspoons of tempeh culture instead of one! How will this effect my tempeh?
It will probably be fine… if anything it might culture a bit faster? More culture is usually fine as long as there’s food to feed it.
explains more product tempeh starter, please?
Are you looking for starter? Here’s the one I used: Tempeh Starter Culture
I have a question regarding your tempeh link. It says in that amazon ad “4 packets”. Were there 4 separate starter packettes inside that bag of starter you linked? Or is that 4 bags of the starter culture in the shipment? I realize at that link it is temporarily unavailable but I have seen that brand before, so I am curious if it includes 4 separate packettes for freshness.
To be honest, I haven’t bought tempeh starter in years. And what you see with the Amazon links will depend on where you are located. I imagine if it says 4 packets then it should be 4 separate packets. I do buy cheese starters regularly and they are always in separate packets so they stay fresh. Cheers!
To dehull, try adding some baking soda in the water when draining the beans overnight. Cook then dehull. It works with chickpeas (it weakens the pectin bond)
Baking soda does help break down the hulls, but it also changes the pH. I’m not sure if rinsing will completely restore the pH balance. Tempeh needs a slightly acidic pH and baking soda is basic. Have you tried it for tempeh?
Do you use the plastic bag in your bread poofer?
Yes. I put it on a plate in my bread proofer (not directly on the heat pad or the rack.)
my tempeh keeps coming out too crumbly. any suggestions to get it more firm like store-bought always is?
The only time my tempeh is crumbly is when I make it with lentils, which might be in part because lentils are quite small. Are you grinding your soybeans up? Maybe try just cracking them in half. If that doesn’t help, then maybe you’re not culturing them long enough? Good luck!
thank you for the reply. I’m doing whole soybeans.
Then I’m guessing that you’re not culturing it long enough. Maybe you need to either culture it at a slightly warmer temperature, or for a bit longer (try adding 6 hours.)
Could this be made with fresh beans rather than dried?
I’m not sure if it will work with green soybeans. It needs the protein and the right moisture levels. I haven’t tried it, but my guess is that green beans are too moist. You can use sunflower seeds, dried lentils, and other dried beans. So maybe try one of those instead: https://www.fermentingforfoodies.com/lentils-chickpeas-bean-tempeh/
Hi thanks for the great article. I wanted to know whether you think flavouring the tempeh during fermentation would affect the process. I was thinking of making tempeh bacon by adding liquid smoke, garlic powder, tomato paste and smoked paprika.
I would definitely flavour after fermenting. They can both interfere with the fermentation and not ferment, increasing the potential for contamination. Personally, I would steam the tempeh, then cut it into strips before flavouring it.
Hi! Thank you very much for the recipe! I’m trying to fin a mill so it would be easier to de hulled the chickpeas. Do you think something like this would help?
Hi, Had to delete your links or it would be flagged as spam. However, I did look at the links. I think either would work… the trick is having one that is large enough for chickpeas. So if you’re not sure… probably the coffee grinder is better than the grain mill? But that’s only because coffee is larger than grain. Enjoy!
Thank you so much Emillie!