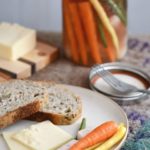


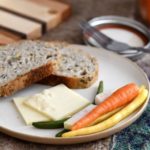
Picnic basket fermented vegetable sticks are delicious, probiotic, and easy. Perfect for snacks, school lunches, picnics, and BBQs.

Fermented vegetable sticks are the one thing that I always have bubbling on my kitchen counters. I love them for so many reasons.
- They are a delicious way to make sure that I’m getting a daily dose of probiotics.
- Everyone loves them, even my kids!
- They are hugely flavorful and don’t need dips or sauces.
- It allows me to process my vegetables right away so that nothing goes off before we get a chance to eat them.
- And the main reason why I always have fermented vegetable sticks in my kitchen is because I’m lazy.
I know that seems backward, how could anyone who is devoted to fermenting be lazy?
But… at 6:30 in the morning when I’m scrambling to fill my kids’ lunch boxes, it is so awesome to have already prepared vegetables in the fridge ready for the line of waiting for lunch containers.
Tips and Tricks for Fermented Vegetable Sticks
Fermented vegetable sticks are really easy and reliable. They are perfect for anyone who is new to fermenting. Here are a few tips and tricks to make sure that everything goes smoothly. And if you are looking for even more fermentation info check out this post on fermentation basics.
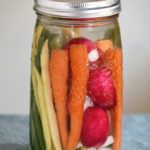
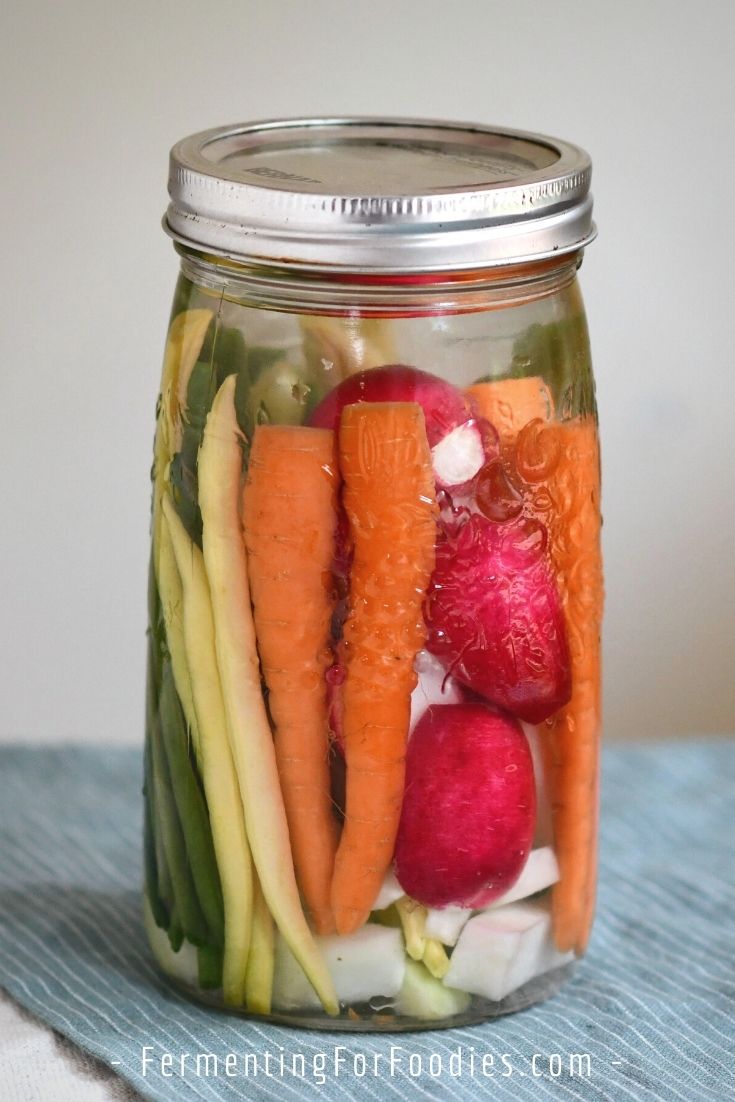
1. Jars
Since this is a relatively short ferment, you don’t need to have a special jar. The key is to use a weight to keep the vegetables below the brine. Try using a wide-mouth mason jar with a smaller jam jar as a weight. Cap with a tea towel or a loose lid to keep the fruit flies out.
Don’t cap it with a tight lid. The vegetables will start to bubble as they ferment, so it’s important to let the gas escape.
2. Long-term Storage
The longer the vegetable sticks ferment, the softer they will be. I recommend only fermenting for 2 to 3 days so they are still crisp. After that, store the fermented vegetables in the fridge and enjoy!
However, salt-brine fermented vegetables can last for several months in a dark, cool closet. Which is perfect, when you have a surplus of vegetables in your garden. There are just a few things you need to do to make sure the fermented vegetables store nicely:
- Increase the salt to 3 tsp (1 Tbsp) for a quart-sized jar. It will be extra salty, but the salt will prevent any contamination.
- Start with a sanitized jar. The easiest way to do that is to pour boiling water into the jar.
- Use a fermentation-specific jar or lid like a Fido jar.
- Don’t use any added culture, as it tends to make vegetables go soft if fermented for more than just a few days.
- Hot peppers and garlic are both prone to going off in long-term ferments. So I generally avoid using them if I’m going to let my ferment go for more than a week.
Flavor Options
Fermented vegetable sticks are perfect for infusing with all sorts of different flavors. Here are a few different ways to add flavor to your pickled vegetables.
Herbs and spices
Herbs and spices can be added right to the ferment. Just pack them in the jar with the vegetables and let the fermentation do the rest.
Here are a few flavor suggestions:
- Garlic: This is my favorite flavor. Simply add 1-2 cloves of garlic to the jar.
- Dill pickle: Add 1 clove of garlic, 1 tsp of pickling spice, and a sprig of fresh dill to each jar.
- Hot and spicy: Add a slice of onion and a hot pepper sliced in half to the jar. The final heat will depend on the spiciness of the pepper.
- Curry: Add 2 tsp of Indian curry spice mix.
- Mustard: 2 tsp of mustard seed to the jar.
- Onion: Fermented onions are mild and delicious. Add 1 onion, thinly sliced, to the jar.
Added Culture
Fermented vegetables don’t need any added culture to ferment well. Most vegetables contain the right mix of bacteria on their skin.
However, adding culture can be a great way to infuse flavor into a ferment. Here are a few suggestions:
- Kimchi: Pack the vegetable sticks into leftover kimchi brine. They will be infused with the flavors of kimchi!
- Tangy: To add a tangy, pickle-like flavor to your vegetables with 1/4 cup of cultured apple cider vinegar or sour kombucha tea.
- Sweet: For sweet pickled vegetables, use unpasteurized honey to provide the culture. Add 2 Tbsp of honey to the vegetables and don’t include any salt. Sweet fermented vegetables are best after only 2 days of fermenting. Otherwise, they tend to go quite soft.
- Super probiotic: Using a commercial vegetable starter is a great way to get a SUPER dose of probiotics with your fermented vegetable sticks.
Fermented Vegetable Sticks
Looking for a quick, healthy, and delicious snack? Make a jar of fermented vegetable sticks! They are so easy. Perfect for all your favorite veggies!
- Prep Time: 15 minutes
- Total Time: 15 minutes
- Yield: 1 quart jar 1x
- Category: Pickles
- Method: Fermented
- Cuisine: Probiotic
- Diet: Vegan
Ingredients
- 1 cup filtered water (more if needed)
- 2 tsp of salt (non-iodized)
- 3 cups of mixed firm vegetables (see notes)
- Added culture or flavor additions (see the section above for options)
Instructions
- Pour 1/2 cup of water into the bottom of a quart-sized (1 L) jar. Add in the salt. Stir to dissolve the salt. Add any culture or flavors that you want to use. See the section above for 10 different flavor options.
- Wash and cut the vegetables into snack-sized pieces. Don’t peel the vegetables, as the skin helps provide the bacteria necessary for the ferment.
- Pack the vegetables into the jar making sure that they are 1-inch below the top. The number of vegetables that can be packed into a jar will depend on the type of vegetables. For example, cauliflower takes up a lot more room than carrots.
- Pour the remaining water over the vegetables. Use as much as is needed to completely cover the vegetables, while leaving at least 1 inch of headroom at the top of the jar.
- Often the vegetables can be packed in tightly so that they don’t float, but if they are floating, use a weight to keep them below the brine. Cap with a lid that will let gas escape. (See section above for details).
- Place the vegetable sticks in a cool and dark location to ferment. (A kitchen cupboard is perfect). After 2-3 days the vegetables will have developed a nice flavor, while remaining crisp.
- Store in the refrigerator and enjoy within 4 weeks.
Notes
- I recommend using a mix of firm vegetables. Carrots, beets, radishes, kohlrabi, green beans, sweet peas, and cauliflower all work well. However cauliflower tends to become a bit smelly, so it isn’t the best for school lunches.
- If you are new to fermenting, see the section above for some tips and tricks to ensuring a good ferment.
I love these! Especially the dill pickle flavour!
That’s one of my favorites too! Thanks!
I just made carrot sticks with yellow curry powder, OMG I love these. Can you ferment zucchini and if so what flavor additives would be good??
So glad you enjoyed your carrot sticks! I’ve got a fermented zucchini relish recipe on this site. However, you could ferment zucchini sticks, as long as you have a very firm zucchini. Otherwise, they’ll go mushy. That’s why I tend to use zucchini for fermented condiments. 🙂 Then I don’t mind them being very soft! Cheers, Emillie
Hi. I am new to fermenting. The first time I tried with beets water and salt. I did it in a fido jar, put it into a kitchen cabinet for two weeks, and it turned out moldy. As I shared this with a friend, she told me that I would need to open it everyday to release gases. Can you please direct me? Thanks so much!
Sorry to hear that you had mold on your beets. I’ve found beets to be particularly prone to mold… especially if they aren’t farm-fresh, and have sat in the fridge for a few days. This is why I usually add a bit of vinegar to my fermented beets. It just helps. (You can check out my recipe here: https://www.fermentingforfoodies.com/fermented-beets/)
As for opening your fido jar… I don’t recommend it. As long as it’s not a decorative jar, it is built to withstand the pressure of a bubbling ferment. The fido seal is designed to allow gas to escape while preventing air (and contamination) from getting into the jar. I use them for any pickles that I’m going to ferment for more than a week. Best of luck with your next ferment!