
Feta is the perfect cheese for beginners. It is cheaper than store-bought cheese and doesn’t require any special tools or techniques. Here is how to make feta in your own kitchen!

Feta is a basic salt-brined, white cheese. It is similar to a variety of white, crumbly cheeses found all over Europe and the Middle East. Recipes vary based on the type of milk available and bacterial culture.
The recipe assumes that you have a basic understanding of the cheesemaking process. If you need more detailed information read my posts on how to make cheese. They cover everything from how to sanitize to the type of milk to use.
Trad or Simplified Recipe
There are lots of different ways to make feta cheese. Since it’s a cheese I’ve been making for several years, I am always trying new ways of simplifying things! So the recipe is written to provide both the traditional cheesemaking steps as well as a few ways to simplify things.
However, unlike a lot of recipes, I don’t recommend acidifying the milk with lemon juice or white vinegar. Feta is a cultured cheese. Culture provides so much of the flavor, I don’t see the point in skipping it.

Forming the Cheese
There are two ways of forming this cheese. Here are a bit more details about each of the options for anyone new to cheese-making.
1. Hanging Ball Method
The hanging ball method is the simplest way to form a cheese. It’s perfect for soft fresh cheeses. It’s also perfect for anyone who doesn’t own a cheese mold.
- To drain cheese using the hanging ball muslin, pour the curds into a colander lined with two layers of butter muslin. (Save the whey! It’s sweet and delicious.)
- Once the majority of the whey has drained, tie the corners of the cheesecloth together.
- Hang the ball of cheese and let it drain for 8 to 12 hours. Many people hang their cheese over the kitchen sink. I find this impractical, so I like to push a wooden spoon through the knot and hang the cheese over a large pot instead. (See the photo above).
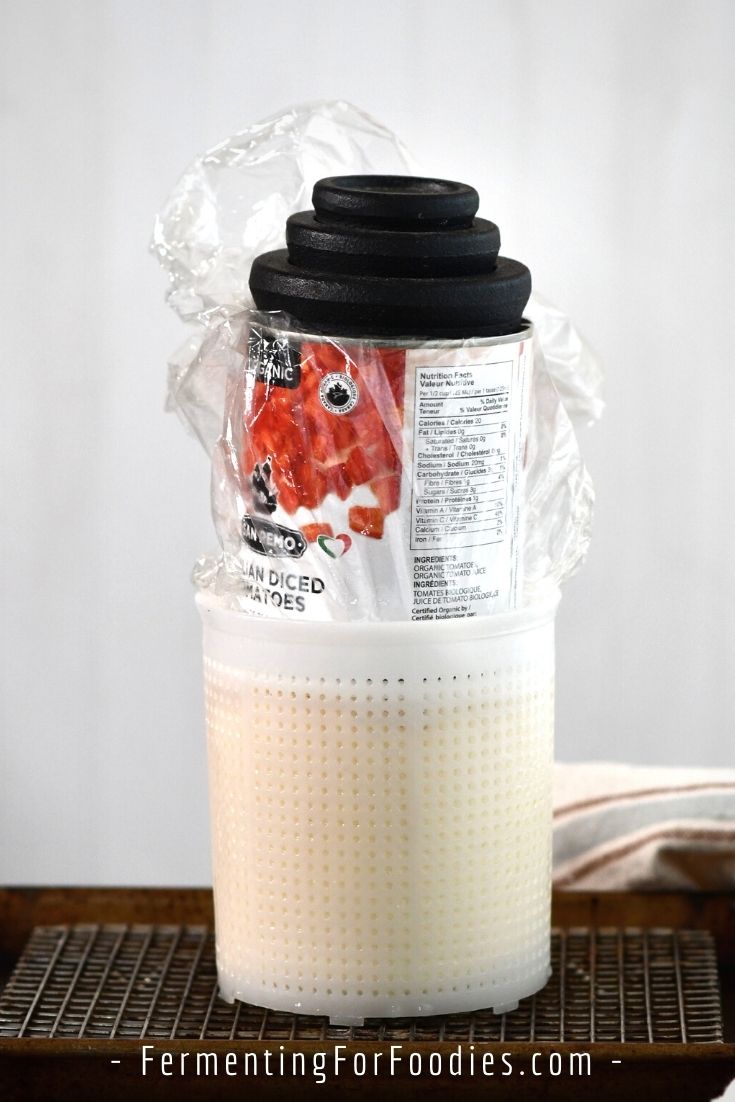
2. Cheese Press
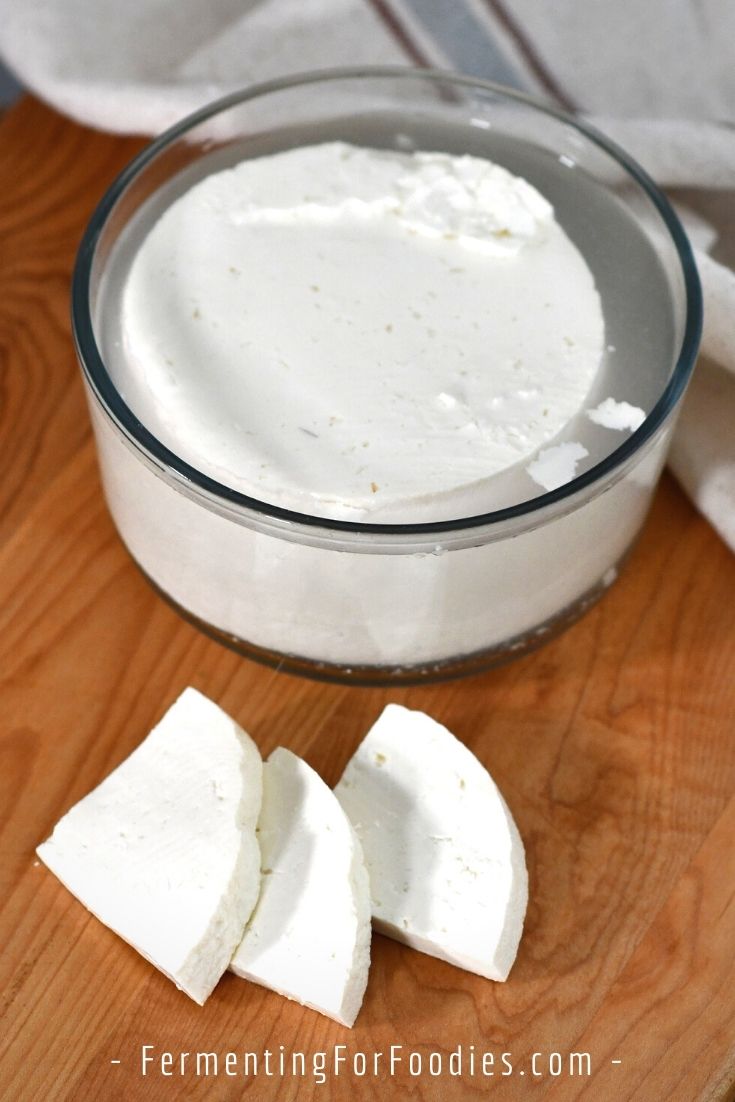
If you get into cheesemaking, I recommend buying a cheese mold. I use mine for all sorts of cheeses. Pressed cheese is firm and sliceable. It’s also probably what you are expecting from your homemade feta cheese.
- To press your cheese, drain the majority of the whey by pouring the curds into a colander lined with two layers of butter muslin. (Just like above, I recommend saving that whey! It’s perfect for adding protein and flavor to soups).
- Remove the butter muslin full of curds from the colander, and pack it into the cheese mold.
- Fold the ends of the butter muslin over the top of the cheese, and add your follower and some weight. As you can see in the photo below, I use a large can of tomatoes placed in a plastic bag, with a few weights from my kitchen scale as a cheese press.
- After 30 to 60 minutes. Remove the cheese from the mold. Flip it over, and press again. I recommend flipping at least twice during the 8 to 12 hour stretch.
- I place my cheese mold on top of a cooling rack place on a baking sheet to catch the whey. A proper plastic cheese draining mat would be a more professional option… but this system works just fine for me.
How to use feta
If you turn a gallon of milk into cheese, you end up with a lot of feta! Here are a few recipes, beyond the infamous Greek salad, that feature this delicious white cheese.
- Stuffed Hasselback baked potatoes
- Fasolakia – Greek green beans and tomato stew
- Spanakopita lasagna – An easy and gluten-free version of spinach pie
- Mediterranean quinoa salad – A hearty version of Greek Salad
- Farinata – Italian chickpea pancake
- Baked polenta – A pizza-like polenta dish
- Turkish chickpea stew topped with kale and feta
How To Make Feta Cheese

Feta is a good cheese for beginners. It involves all the steps involved in cheesemaking but doesn’t require any special techniques or ripening. It is fast, affordable, and delicious!
- Prep Time: 2 hours
- Total Time: 2 hours
- Yield: Approx. 2 lbs of cheese
- Category: Cheese
- Method: Cultured
- Cuisine: Mediterranean
- Diet: Vegetarian
Ingredients
For the cheese
- 1 gallon (4 L) of milk (goat’s milk, sheep’s milk, or cow milk)
- 1/8 tsp of mesophilic starter
- 1/8 tsp of food-grade calcium chloride in 2 Tbsp filtered water
- 1/4 tsp of liquid rennet or 1/4 tablet in 2 Tbsp filtered water (enough to set 1 gallon of milk)
For the brine
- 1 cup filtered water
- 1 1/2 Tbsp salt (non-iodized)
Instructions
- Sanitize your cheesemaking tools. (Simplified option: Sanitizing is not required for fresh cheeses. However, if you plan on keeping your feta for longer than a few weeks, or have issues with mold in your home, I recommend sanitizing your equipment).
- Heat the milk to 86 F (30C). Stir in culture and maintain the milk at 86 F for 1 hour. (Simplified option: Sour and flavor the milk by mixing it with 1/4 cup of cultured buttermilk. Let it sit out at room temperature for 2 to 4 hours. You want it slightly flavored, but not too sour).
- After the milk has acidified, stir in calcium chloride, mixing well. Then add the rennet and mix thoroughly.
- Maintain the milk at 86 F (30C) and leave it for 1 hour for the curd to set. DO NOT STIR or touch the milk while it sets the curd.
- When the curd shows a clean break, use a long knife to cut it into 1/2-inch cubes.
- Cook the curds by stirring every 5 minutes for the next 1/2 hour, slowly raising the temperature to 90F (32C). (Simplified option: Give the curds a good stir. Put a lid on the pot and let the curds rest for 1/2 hour.)
- Line a strainer with butter muslin and pour the curds and whey into it. I usually catch my whey in a large bowl, because it’s useful and delicious! Either pack the drained curds into a feta mold or hang the curd in the butter muslin. (See the section above for photos and details of each of these options).
- Allow the curds to drain for 8-12 hours. If you are using a mold, flip the cheese at least twice to ensure even drainage.
- Prepare the brine ahead of time to make sure that all the salt has dissolved.
- After the cheese has finished draining, unwrap it from the butter muslin and place it in the brine. Store it in the refrigerator and allow it to ripen for at least 5 days before serving.
Notes
- Please read up on the detailed processes involved with cheesemaking if you are uncertain about any of the steps in this recipe.
- I’ve also used milk kefir as a culture, however, the yeast in kefir gives the cheese Swiss cheese-like holes.
- If you find that the feta is too salty, simply reduce the amount of salt in your brine to 1 Tbsp or rinse the cheese before using it.
- Feta will last for at least a month in the fridge. However, because it contains a living culture it will continue to ferment and sour over time.
Emillie, is there a place to buy starters in Victoria, or are you getting it all via mail?
I bought a cheese making kit in Seattle. But I also got some culture here: http://www.homesteadjunction.ca/ However, if you were interested I definitely can share some feta culture. I have a ton, and it only lasts so long (mine is best before May).
It would be wonderful to mooch some culture off you sometime.
I often think we need a Homesteader’s Junction kind of garage business here in Victoria, though I think the market would be so small it might never fly. Maybe I should be content with mail order.
I think Ingredients might carry a few different starters, but not that much. Just drop me a line when you want the feta culture.
This is great! I love feta on all salads, not just Greek salad.
Mine seemed ok until it was in the brine for a couple days then it started dissolving in the brine. Any idea why ?
I did the hanging ball method because I don’t have a press
It’s likely because it wasn’t pressed. That makes it softer and less dense. When this happens to me, it tends to crumble, so I just sieve it out of the brine. If you want to stop it, you can drain it from the brine, then use it up in the next 2 weeks. Good luck! Emillie
Perfect! Thank you. I look forward to trying again when my press comes.