


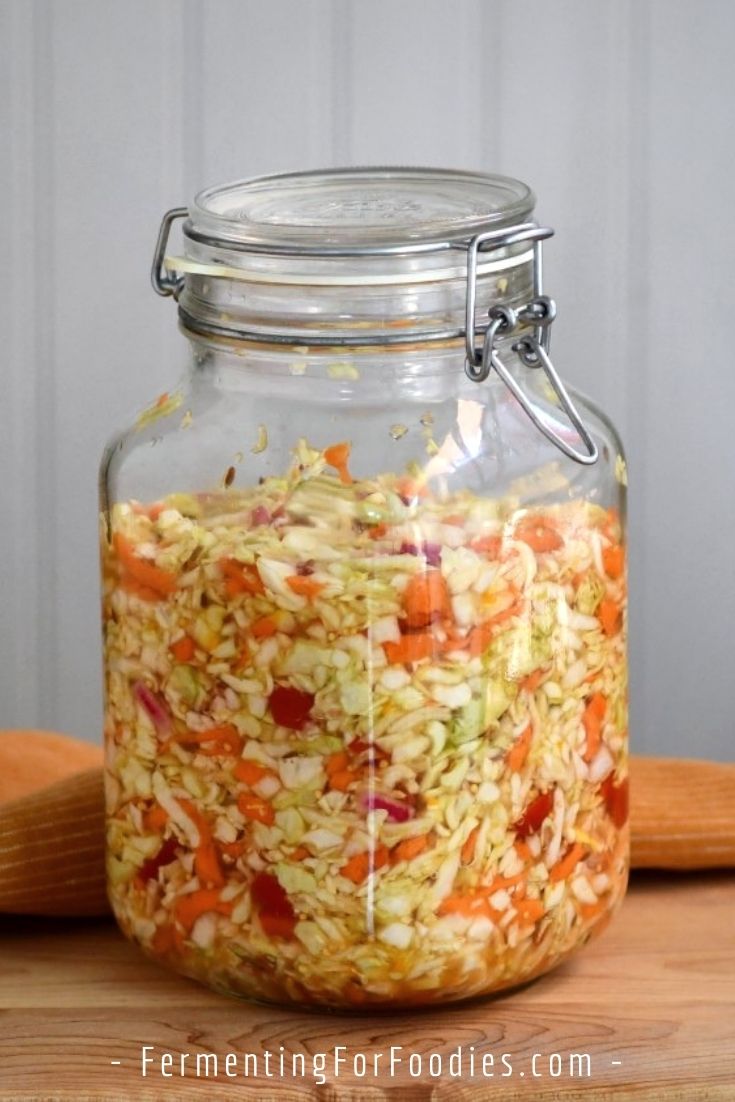
Piccalilli is a British-style Indian relish. This fermented piccalilli is made with seasonal vegetables for a sweet and spicy condiment. It is perfect with cheese sandwiches or at a BBQ.
When we were staying at Tracebridge, Katie served cream of cauliflower soup which she recommended eating with a forkful of fermented piccalilli. I had never heard of piccalilli. (And I accidentally kept calling it Piccadilly.) However, it was the perfect accompaniment for the rich creamy soup.
What is Piccalilli?
Piccalilli is a British interpretation of an Indian-style pickled relish. I had never tried store-bought piccalilli, and Katie assured me that it was fairly different from her lactic acid and salt-fermented condiment.
Intrigued, I explored other piccalilli recipes, which were much more sweet and vinegary. I particularly liked the River Cottage version of piccalilli. So my fermented piccalilli recipe is a mash-up of these two very British recipes.
Sweet fermented piccalilli
Making a sweet cabbage ferment is unusual. Cabbage quite naturally sours with its own bacterial culture. However, this recipe switches the usual fermentation method by using a yeast-based culture to ferment sugar. The exact sweetness will depend on how long it is left to ferment.
For a more traditional piccalilli flavor, I recommend fermenting for just 3 to 5 days. It’s a perfect recipe for beginners or anyone who doesn’t typically enjoy sauerkraut.
Wondering how to serve piccalilli?
- This sweet and sour condiment is perfect with Indian food, like pakoras or dosa.
- Serve it like a relish on sandwiches or at a barbecue.
- It’s a trendy addition to a charcuterie board.
- Follow Katie’s suggestion and add it as a topping to soups. It’s particularly nice on cream soups or plain lentil soups.
Note: This recipe was updated from the original version. If you are looking for a savory, spiced fermented sauerkraut, check out my mixed vegetable and turmeric sauerkraut. It’s practically the same as the original piccalilli recipe.
Sweet Fermented Piccalilli

Piccalilli is a British-style Indian relish that is sweet, spicy and sour. This fermented piccalilli is made with seasonal vegetables. It is perfect with dosas, in a cheese sandwich or served at a BBQ. See the section above for more serving suggestions.
- Prep Time: 15 minutes
- Total Time: 15 minutes
- Yield: 2 quarts 1x
- Category: Pickles
- Method: Fermented
- Cuisine: British
- Diet: Vegan
Ingredients
- 1 medium head of cabbage
- 3 cups of finely diced seasonal vegetables (see notes for options)
- 1 red onion
- 1/4 cup of sugar
- 2 Tbsp freshly grated turmeric root (or turmeric powder)
- 1 Tbsp of diced red chili (optional)
- 2 tsp yellow mustard seeds
- 2 tsp salt (non-iodized)
- 1 tsp cumin
- 1 cup of cultured apple cider vinegar, see notes for other culture options
Instructions
- Grate or finely dice all of the vegetables.
- Mix vegetables with salt, sugar, and spices in a big bowl with a wooden spoon.
- Pack the vegetables into a 2-quart jar (or several smaller jars), leaving at least 1 inch of headroom in a quart jar or 2 inches in a 2-quart jar. Divide the vinegar between the jars. Use the wooden spoon to pack the vegetables down so they are below the liquid.
- Top the vegetables with a weight to keep them below the liquid. Let them ferment somewhere coolish and dark for 3 to 5 days. A kitchen cupboard is perfect.
- Store the piccalilli in the fridge to stop the fermentation. Taste before serving and add a bit more sugar if you want it to be sweeter.
- This ferment will last for at least a month in the fridge.
Notes
- Traditional vegetables to include in a piccalilli are cauliflower, carrots, broccoli, green beans, zucchini, sweet peppers, and fennel.
- This piccalilli can ferment with any sugar-based culture. I recommend raw apple cider vinegar because it adds the right sort of flavor. You could also use strong brewed kombucha, water kefir, or ginger bug.
- I usually ferment in a fido jar
because it’s easy. The most important thing is to keep the vegetables from being exposed to air, so if you are using a regular mason jar be sure to use a weight.
This looks like a great recipe. I am new to fermenting and am wondering how long this lasts in the fridge?
As long as you don’t serve it with a dirty fork, it should last for several months. I’ve actually never had a sauerkraut-like ferment go off once it’s in the fridge, so I don’t really know. 🙂
This seems like an interesting idea. When you add the vinegar does it end the fermentation, as vinegar is the end process of wine fermentation? Thus it would last in the fridge somewhat indefinetly.
To be honest, I usually keep all my ferments indefinitely (or at least until we’ve eaten them!) The honey and vinegar don’t curb the fermentation as much as the refrigeration. In this case, I’m using the natural kraut fermentation to soften and blend the veg. The honey and vinegar are for flavour. Enjoy!
Hello, English is not my first language and it is the first time I do ferment food.
Not a good start for me. I am doing the recipe right now and do not understand how 1/2 cup of water in my jar
would be enough liquid to bring to a brime level. I did put water enough to cover once I had the weight in place.
My second international is about closing or not a lid. I have no idea.
Sylvie
My second interogation not international as my keyboard wrote.
Hi Sylvie,
This is a cabbage ferment, so it should release most of the liquid for the brine from the vegetables. If you’ve packed the vegetables into the jar(s) then you’ll only need a little bit of liquid to cover. Feel free to use a fermentation lid (pickle pipe, airlock, etc.) or leave it covered with a cloth. Using weight to keep the vegetables below the brine is all you need to do to ensure a safe ferment. However, it’s nice to use a fermentation lid if you have one. Good luck!
This is really great!
Thanks!
Hi
My question is this, what do you do with the brine?
I’m making sauerkraut for the first time but, I am yet to see a blog that states exactly whether the brine is added when storing the sauerkraut or not. Help. My kraut is waiting for a decision .
By the way I love your version of picallili.
Regards,
Nicole
Great question! Most sauerkraut recipes don’t involve adding water. This is because the salt causes the cabbage to sweat enough liquid. However, that can take a while, and involve pounding the cabbage into the jar. I have both types of recipes on my blog. My trad recipe: https://www.fermentingforfoodies.com/easy-fermented-sauerkraut/ and one that involves adding water: https://www.fermentingforfoodies.com/how-to-make-your-own-vegetable-starter-culture/. My cookbook also has a water-added kraut recipe. If you’ve already packed your jar and the cabbage is fully submerged, I don’t recommend adding more water. It’s best not to open the jar at all once it has started fermenting. Just put it in your cupboard and let it rest until you’re ready to eat it!
Once you’ve opened it, store it in the fridge. Again, there’s no need to add more water, even if the cabbage doesn’t remain fully submerged. Unlike pickled carrots and turnips, the cabbage doesn’t seem to brown quite as much when it’s not under the brine in the fridge. Cheers! Emillie
Hi
Thanks for responding. However you did not answer the question I asked. I did not ask about adding water to the sauerkraut so your response had me a tad confused!!
I shredded more cabbage that could fit in a bottle so, I used a small bucket. At the end of the process, I wanted to know what should be done with the brine (the liquid/cabbage sweat) created!!
I removed the cabbage to store but, left the brine out. There was probably about 1 1/2 cups of brine.
I await your response.
Regards,
Nicole
Sorry for the slow response. For some reason, your comment got caught in my spam filter. I usually make several smaller jars. However, if you’re packing from a large container into smaller containers then you definitely want to include the brine. You can either make a new brine (1 Tbsp of salt per quart of water) or add the brine from the bottom of your bucket. Cheers!